The Teamwork Client

Teamwork Client is where you can manage your projects. It enables you to select/de-select projects to work on with, and to provide you with access to all team operations like commit, update, branching, tagging, etc. To open Teamwork Client:

  1. Select Team > Login from the toolbar of Visual Paradigm. If you have no prior connection to any server, you are then prompted to enter the login details of VPository. If your team have already subscribed to VPository, enter your login details. If you want to subscribe to VPository, click here for details. If you want to use Teamwork Server, click Other Repositories and enter the login details.
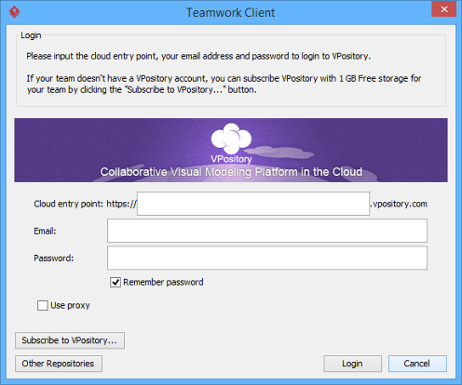
    Login window
    Login window
  2. Click Login.
  3. Since this is the first time you login to the server, you are prompted the Open Project window with available projects listed. Click Cancel.
  4. Now, you are connected to the server. When you select Team  > Login again, you can then open Teamwork Client.

Overview of Teamwork Client window

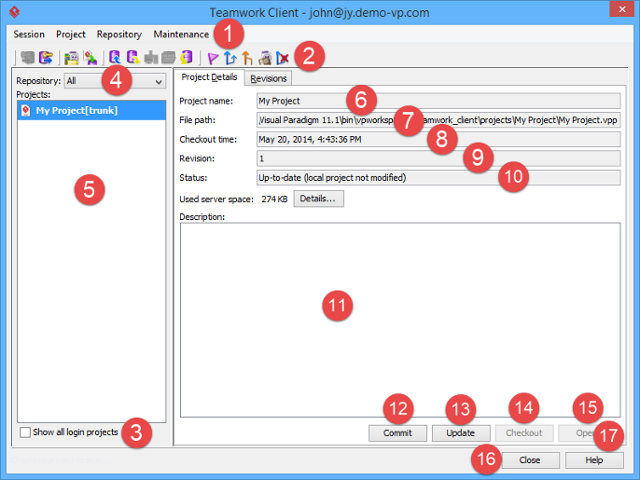
The Teamwork Client window
No. Name Description
 1 Main menu

Session: It is a period of active connection with server.

               Login: Login the server. After you choose it, you will be able to execute all actions.

               Logout: Logout the server. After you choose it, you will not be able to execute any actions.

Project: Provides an access to main functions, such as commit and update.

             Manage Project: Select a project that you get involved in.

             Import Project to Repository: Import a new project to the server.

             Commit: Commit your current modified project to the server.

             Update: Update the latest copy of project from the server to your computer.

             Checkout: Click it to checkout the project selected in Projects list. It will be disabled when the selected project has already been checked out.

             Open: Click it to open the checkout project on your computer.

             Tag: Create a new tag for your current project. It allows you to produce a static release version of project.

             Branch: Create a new branch for your current project. It becomes a duplication of project to perform isolated changes.

             Merge: Combine the selected branch(es) with the trunk (main project). When some changes made in branch, it will be made in trunk as well.

             Switch: Switch from a branch/ tag to another branch/ tag or from the trunk (main project) to a branch/ tag and vice versa.

             Delete Branch: Select a branch to delete, for preventing accidental modifications in branch.

             Reset Password: Reset your account's password.

             Revert Local: Click it to undo un-committed changes made on the local project copy.

Repository:

             Synchronize Design Pattern to Server: Synchronize the template files stored in workspace with those stored in repository. When a conflict occurs, you will be asked which design template files to keep.

Maintenance: All the functions under the Maintenance menu are prepared for diagnosis purposes. You should not run them unless you are requested by Visual Paradigm support team. And when you are requested to execute any maintenance function, you will be briefed.

 2 Toolbar

Login: Log into the server. After you choose it, you will be able to execute all actions.

Logout: Log out the server. After you choose it, you will not be able to execute any actions.

Manage Project: Select a project that you get involved in.

Import Project to Repository: Import a new project to the server on the list.

Update: Update the latest copy of project from the server to your computer.

Commit: Commit your current modified project to the server.

Checkout: Click it to checkout the project selected in Projects list. It will be disabled when the selected project has already been checked out.

Open: Click it to open the checkout project on your computer.

Revert Local: Click it to undo un-committed changes made on the local project copy.

Check for Update: Click it to check whether the project is up-to-date or not.

Tag: Create a new tag for your current project. It allows you to produce a static release version of project.

Branch: Create a new branch for your current project. It becomes a duplication of project to perform isolated changes.

Merge: Combine the selected branch(es) with the trunk (main project). When some changes are made in branch, it will be made in trunk as well.

Switch: Switch from a branch/ tag to another branch/ tag or from the trunk (main project) to a branch/ tag and vice versa.

Delete Branch: Select a branch to delete, for preventing accidental modifications in branch.

 3 Show all login projects
By checking it, projects that have been checked out before will all be displayed. By unchecking it, only projects checked out by the current member will be displayed.
4

Repository

It refers to the list of available project(s). Select All from the drop-down menu means all projects managed by all eligible members who have logged into server in this workspace will be listed. On the other hand, the project(s) managed by a specific member can be selected from the drop-down menu. If you uncheck Show all login projects and do not select the current member in Repository, no project will be listed.

5 Projects It lists the project(s) you selected to manage.
6 Project name The name of selected project.
7 File path The path of the selected project file. It is shown only when project is checked out from the server.
8 Checkout time It displays the date and time of your first checkout for the project.
9 Revision It displays the revision of your local project copy. Note that the revision here does not always mean the latest revision on the server.
10 Status It displays the status of selected project, such as "Not Checked Out" will be shown when the project has not been checked out yet.
11 Comment It shows the textual description of selected project written by administrator when creating project.
12 Update Update the latest project from the server to your computer.
13 Commit Commit your current modified project to the server.
14 Checkout Click it to checkout the selected project.
15 Open Project Click it to open the checkout project on your computer. If the project has not checked out yet, it will perform a checkout prior to opening project.
16 Close Click to close the Teamwork Client.
17 Help Click it to get assistance from help system.
The description of the Teamwork Client window
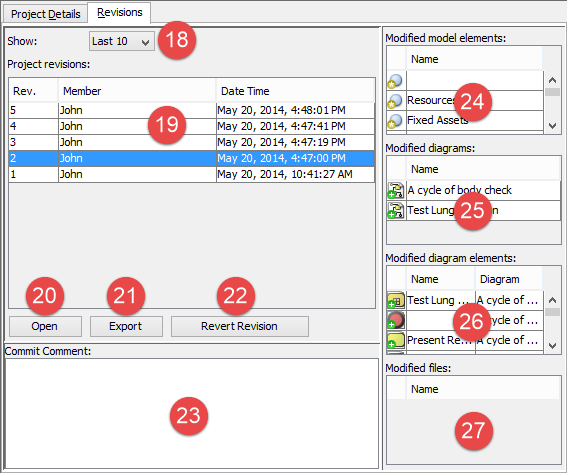
The Revisions tab of the Teamwork Client
No. Name Description
18 Show drop-down menu
Select the number of latest project revision to view from the drop-down menu.
19
Project revisions
It lists all the latest project revisions. The number of revisions is in accordance with the show drop-down menu.
20 Open
Click it to open the selected revision of project.
21 Export

Export selected revisions: Export the selected revision(s) to a folder.

Export all revisions from repository: Export all the projects in repository to a folder.

22 Revert Selected Undo changes committed by the selected revisions.
23 Commit Comment A textual description of commit given by you or your teammates before committing.
24 Modified model elements
It displays the modified model elements of the selected revision.
25 Modified diagrams It displays the modified diagrams of the selected revision.
26 Modified diagram elements It displays the modified diagram elements of the selected revision.
27 Modified files It displays the modified Teamwork Files of the selected revision.
The description of Revisions tab

Related Resources

The following resources may help you to learn more about the topic discussed in this page.

 
1. Introduction to team collaboration Table of Contents Chapter 2. Basic features

We use cookies to offer you a better experience. By visiting our website, you agree to the use of cookies as described in our Cookie Policy.OK