Importing XMI
You can migrate your works done in another software to Visual Paradigm through XMI, provided that the software supports XMI. In this chapter, you will see how to import an XMI file.
Importing XMI to current project
- Select Project > Import > XMI... from the toolbar. This displays the Import XMI window.
- Specify the file path of the XMI to import and configure the import if necessary.
- Click OK.
NOTE: All changes made in project will be overwritten by data in XMI. For example, if class Foo is renamed to Bar. By importing an XMI exported before renaming class, Bar will be renamed to Foo.
An overview of Import XMI window
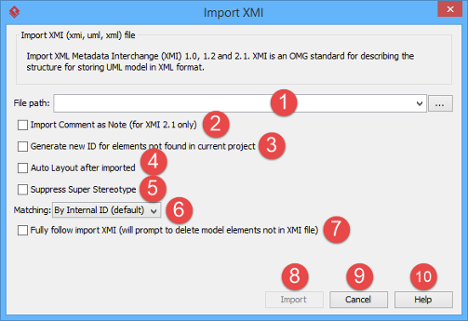 |
| An overview of Import XMI window |
|
|||||||||||||||||||||||||||||||||
| Description of Import XMI window |
Importing XMI to project with command line interface
To import XMI to a project through command line:
- Browse the scripts folder under the Visual Paradigm installation directory. For Mac users, you can find the scripts folder in the Visual Paradigm package by right clicking on it and then selecting Show Package Contents. Then look in Contents\Resources\app\scripts for the scripts folder.
- Copy the script file ImportXMI and paste to the bin folder of Visual Paradigm installation directory.
- Start the command prompt.
- Navigate to the bin folder of Visual Paradigm installation directory.
- Execute the script by supplying the required parameters. For example:
ImportXMI -project C:\Demo\Demo.vpp -file C:\Demo\input\sample.xmi
Below is a description of parameters:
Parameter Description Example -project Project path C:\Demo\Demo.vpp -file The filepath of the XMI file to import C:\Demo\input\sample.xmi Parameters for ImportXMI
Related Resources
The following resources may help you to learn more about the topic discussed in this page.
| 1. Exporting XMI | Table of Contents | Chapter 5. Export and Import BPMN 2.0 |