Configure stereotypes
You can configure stereotypes, not just to create and name stereotypes for specific model element types, but also to format stereotypes like to set their colors, line formatting and font, and to define their tagged values. By configuring stereotypes, domain specific stereotype set can be built.
To configure stereotypes:
- Select Window > Configuration > Configure Stereotypes... from the toolbar.
- Click on the drop down menu Scope at the top left corner of the Configure Stereotypes window, select whether to configure stereotypes in workspace or in the opening project.
NOTE: Initially, stereotypes exist in workspace rather than in project. When you apply a stereotype to any model element, a copy of that stereotype will be made from workspace to project.
By modifying stereotype in workspace, changes will not be applied to current project nor any project that has used the stereotype.
To configure stereotype only in current project, you must select Project as scope.
Alternatively, select Workspace but let the option Apply changes to stereotypes in current project on. - Select the type of model element that you want to add stereotype or edit its existing stereotypes.
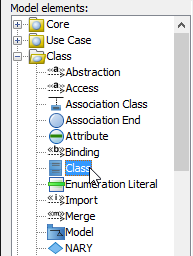
Select class to edit its stereotypes - You may now perform any of the following action:
- If you want to edit an existing stereotype, select the stereotype and click Edit....
- If you want to add a stereotype, click Add....
- If you want to remove a stereotype, select the stereotype and click Remove.
- If you are adding or editing a stereotype, update its specification and click OK to confirm editing. For details about editing a stereotype, read the coming section.
- Click OK to confirm.
An overview of Configure Stereotypes window
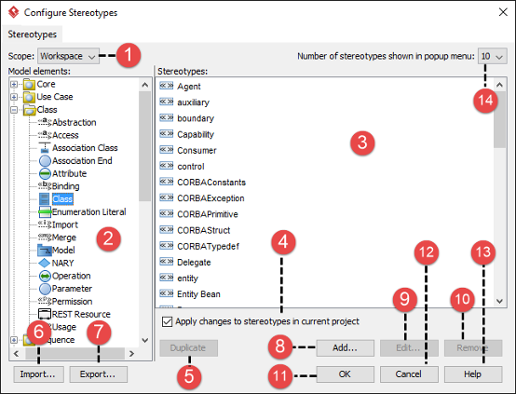 |
| An overview of Configure Stereotypes window |
|
|||||||||||||||||||||||||||||||||||||||||||||
| Description of Configure Stereotypes window |
Editing stereotype
By adding or editing a stereotype, you can specify its icon and adjust its fill, line and font style in the General page within the Stereotype Specification.
 |
| Editing stereotype |
By applying a stereotype that has icon defined to a model element, the icon above the name of model element, near the stereotype. You can optionally make the model element shown as the icon. For details, read the previous chapter. To specify icon, click on the ... button near the preview of Icon. Then, select the image file of icon.
You can also configure the formatting properties of the stereotype by clicking Configure.... In the popup window, you can set the foreground, background and line styles by first checking Use and then start the editing. The settings will be applied automatically to model elements that have the stereotype applied.
Defining tagged values for stereotypes
A stereotype may have properties, which may be referred to as tag definitions. When a stereotype is applied to a model element, the values of the properties may be referred to as tagged values.
You can define tagged values for stereotypes. By doing so, when you apply the stereotype with tagged values defined to a model element, you can fill in the values for the model element.
- Select Window > Configuration > Configure Stereotypes... from the toolbar.
- In the Configure Stereotypes window, select the stereotype that you want to define tagged value and click Edit. If you want to add a new stereotype, select the base model type and click Add...
- In the Stereotype Specification window, open the Tagged Value Definitions tab.
- Click Add. Select the type of tagged value to define. The type of tagged value limits the type of content user can enter for a tag.
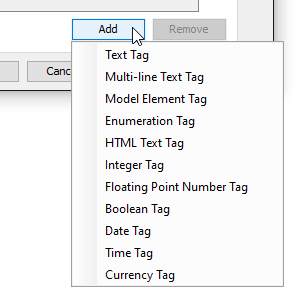
Adding a tag Tag type Description Text The most common and general type of tagged value that consists of words. Multi-line Text The value of tag is a text in multiple lines. Model element The value of tag is a model element in project. Enumeration The value of tag can be chosen from a list of possible values. For example, to select "red" out of values red, green and blue. Integer The value of tag must be a real number. Floating point number The value of tag must be a number that consists of one or more digits. Boolean The value of tag muse be either true or false. Date The value of tag is a date. Time The value of tag is a time. Currency The value of tag is a text that represents currency (e.g. USD, RMB). Type of tags - Double click the name cell and enter the name of tag. Repeat step 4 and 5 to add all tagged values for this stereotype.
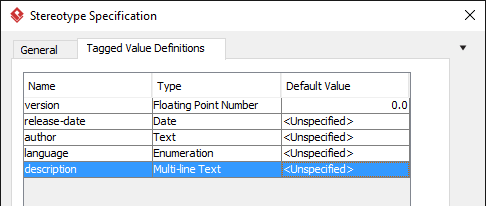
Tags defined - You can assign a default value to a tag by editing the Default Value cell. Usually, you give a tag a default value when the value is true in most cases. For example, a tag "in-door-temperature" can have "25" as default value.
Related Resources
The following resources may help you to learn more about the topic discussed in this page.
| 1. Apply Stereotype to Model Element | Table of Contents | 3. Shortcut of creating stereotyped model element |