Branching
In terms of team collaboration, a trunk refers to the main stream of development. If you create a new project, you will spend the majority of your time making changes and committing them to the trunk of your repository.
Branch is defined as a copy of work derived from a certain point in the trunk. It sets up an extra space for users to work on and make modifications without disturbing the trunk. As soon as the modifications in branch are done, you can merge it back to the trunk.
Creating a branch
- Select Team > Utilities > Branch... from the toolbar.
- When the Create Branch window appears , enter its name in the Branch Name field for your new branch and select whether to start working on the branch or to stay in trunk. Click OK to confirm.
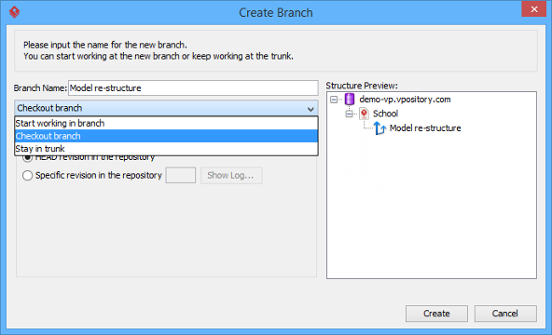
The Create Branch window
The three options in the drop-down menu are Start working in branch, Checkout branch and Stay in trunk. Select Start working in branch means you create, checkout and open a new branch and then start working on it. Select Checkout branch means you create and checkout a new branch but just keep it in repository for working on it later on. Select Stay in trunk means you create a new branch but do not check it out and do not show it in repository either.
NOTE: For Teamwork Server, you can create branch from a specific revision of trunk by selecting Specific
revision in the repository and entering the revision number. On the other hand, select HEAD revision in the repository
if you want to create a branch from the latest revision in trunk. Finally, click OK button to confirm.
Merging a branch
When the development activity of branch has been completed, you can optionally merge the branch back to trunk. To merge:
- Work in trunk. Select Team > Utilities > Merge... from the toolbar.
- When the Merge window appears, select the branch you want to merge to the working trunk. A specified revision of project can be merged both from/to by selecting From Revision and entering the revision number of from and/or to revision. You can also click on the Show Log... button to popup a window with revisions listed and then select the revision from the list. Click OK to continue.
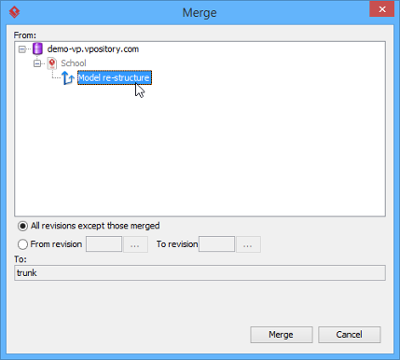
The Merge window
Related Resources
The following resources may help you to learn more about the topic discussed in this page.
| Chapter 3. Advanced features | Table of Contents | 2. Tagging in Server |