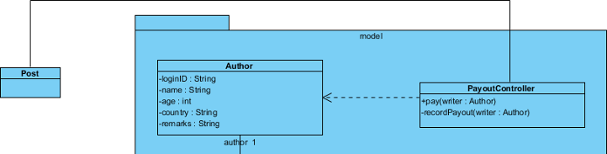
Resource-Centric Interface
Visual Paradigm is the first vendor to introduce the resource centric diagramming interface. The resource centric interface greatly improves the efficiency of modeling. It can make sure the modeler is able to create a diagram with correct syntax more quickly. The utmost importance thing is that you don't have to go back and forth between the toolbar and the diagrams for creating diagram elements, making connections and modifying the diagrams.
 |
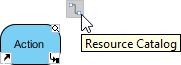
| Resource Catalog |
Creating shapes through Resource Catalog
Resource Catalog is an important part of the entire Resource Centric Interface. Resource Catalog presents a single icon that appear top right of each shape. You can create shape by dragging out that icon and choosing the shape to create from the popup catalog panel. Resource Catalog also records the frequency at which the icons are being used. You can always access the frequently used icons quickly, which makes editing much more efficient.
To create a 'related shape' from an existing shape:
- Move the mouse pointer over the source shape.
- Press on the Resource Catalog button at top right and drag it out.
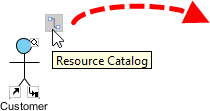
Dragging Resource Catalog button - Release the mouse button at the position where you want the target shape to be created. This popup the Resource Catalog.
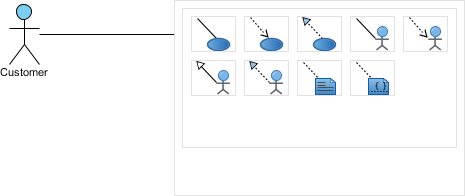
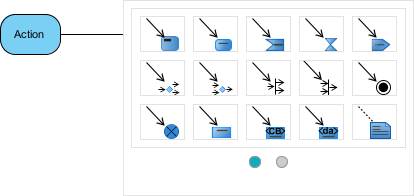
Resource Catalog - Shape types that can be created from the chosen source shape are listed in Resource Catalog. By moving your mouse pointer over each resource, you can view the name of shape and connector type at the bottom of the catalog panel.
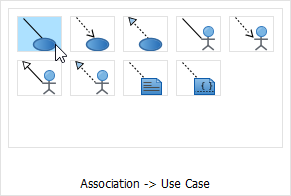
To create a use case - Click on the appropriate shape to be created. As a result, another shape is created and linked with the source shape.

Use case created from actor - Name the created shape and press Enter to confirm editing.
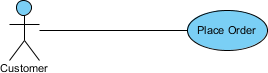
Use case named
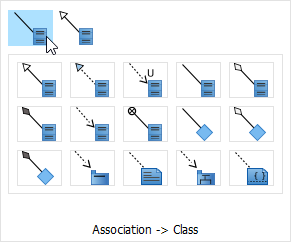
Frequently created shape
Resource Catalog also records the frequency at which the resources are being used. You can always access the frequently used icons quickly, which makes editing much more efficient.
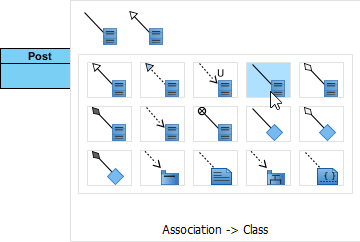
Take the following image as an example. You can see an additional row of resources are displayed at the top of Resource Catalog, with two resources in it (in this example). Those resources are actually resources that you have used before. They are ordered based on the number of time being used. In this example, Association -> Class is the mostly used resource, so come first. Generalization -> Class resource is less popular than the Association resource, so come second. And same as how you can use other resources, you can click on a frequently used resource to use it now.
 |
| To access frequently used resource |
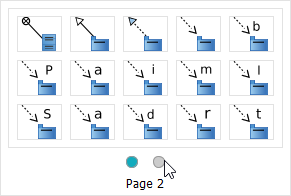
Using slider
When there are too many resources available to a chosen shape, you may have to find the resource that you want to access on another 'page'. You can do this by clicking on the buttons on the slider, at the bottom of Resource Catalog.
 |
| To open the second page of Resource Catalog |
Connecting shapes through Resource Catalog
For relating two shapes together, you have to link one shape to another. With Resource Catalog, you can not only link them up, but also select an appropriate relationship for them.
- Move the mouse pointer over the source shape.
- Press on the Resource Catalog button at top right and drag it out.
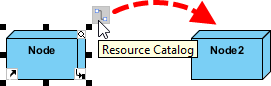
Dragging Resource Catalog button - Release the mouse button on the target shape.

Dragging to another node - The connector types supported by the source and target shapes are listed in Resource Catalog. By moving your mouse pointer over each resource, you can view the name of shape and connector type at the bottom of the catalog panel.
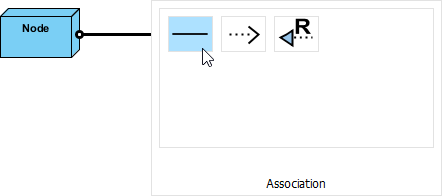
To create an association between two nodes - Click on the type of connector to be created. As a result, two shapes are linked together.

Association created between nodes
Using quick connect
With quick connect, you are able to search the preferred shape and connect to it on the diagram accurately and quickly.
- Move the mouse pointer over the source shape.
- Click on the Resource Catalog button at top right.
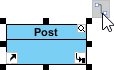
Clicking on the Resource Catalog button - From Resource Catalog, click on the appropriate resource. For example, click on Association -> Class if you want to connect to an existing class on the same diagram with an association.
To create an association with another class - You are prompted to enter the name of the shape to connect to. You can either create a new shape or select an existing shape by typing its name in the text field of Quick Connect dialog box. To select an existing shape, enter its full name directly or just type the first letter of its name. As a result, a list of shapes which match with the word(s) you typed will be displayed. You can also press the Down key to select it from the popup list.
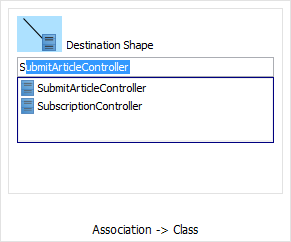
Classes are filtered according to the entered text - The shape will be spotlighted on the diagram following the active selection in the drop-down list.

Class is spotlighted - Press Enter to confirm your selection. The two shapes will be linked automatically.
Association created between classes NOTE: You should click the resource icon in accordance with the existing shapes on your diagram.
If the shape does not exist on the diagram, you won't be able to find it in the drop-down list.
Creating part shape
Resource Catalog also supports the creation of part shapes, such as a pin attached to UML action, a class put inside a composite class, an activity parameter node attached to activity, a port attached to a component etc. To create a part shape:
- Move the mouse pointer over the source shape.
- Click on the Resource Catalog button at top right.
Clicking on Resource Catalog button - From Resource Catalog, click on the part shape to create.
As a result, two shapes are linked together.
Create input pin

Input pin created
Creating structure
Resource Catalog supports some model elements (e.g. Action in Activity Diagram) with creating a structure of elements. Instead of creating shapes one by one, branch resource icon helps tro speed up the shape creation process; you thereby can create several shapes simultaneously.
- Move the mouse pointer over the source shape.
- Click on the Resource Catalog button at top right.
-

Clicking on Resource Catalog button - From Resource Catalog, select the kind of structure to create.
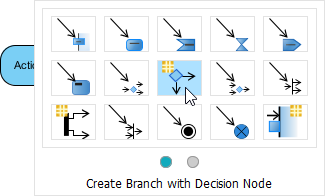
Create a branch of decision - As a result, two shapes and a decision node are created and connected.
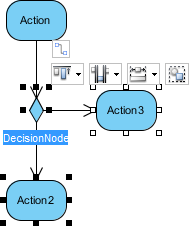
Create Decision Node and Actions NOTE: There is an orange asterisk on the branch resource icon.
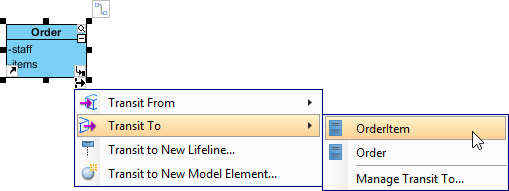
Managing transition of shapes
Model transitor enables you to trace between model elements across different phases of development. Once a transition is created between two shapes, you can navigate between them through the resource centric interface.
Move the mouse on a shape and select Model Transitor> Transit To and then select the shape's name you would like to transit to/from from the pop-up menu. As a result, the vision will be diverted to the selected shape after transition is selected. Thereafter, you can transit to/ from between these two shapes.
 |
| Transit from one shape to another |
| NOTE: | Transition does not only apply on two shapes on the same diagram, but also two shapes in different diagrams. |
Adding and opening reference
For providing extra information to shapes, you can insert both internal and external resources, such as a shape, a diagram, a file, a URL through the resource centric interface. After editing references, they can be opened throughout the resource centric interface.
- Move the mouse on a shape that you would like to insert references for, click the References resource icon at the bottom left corner and select a reference option from the pop-up menu.
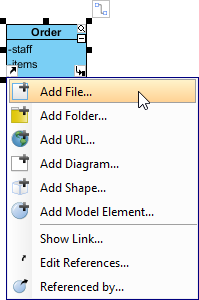
Select Add File... from the pop-up menu - In the file chooser, select the file to reference to. When done, you can click the References resource again and the reference you have just created will be revealed on the pop-up menu. You can select it to open it.
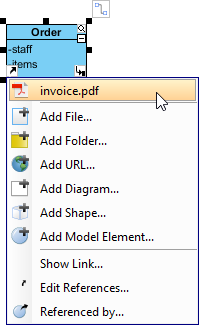
The newly created reference
Splitting connection by shape
Resource centric supports some connectors (e.g. Control Flow in Activity Diagram) with splitting the connector by adding another shape.
- Move the mouse on the connector between two shapes and select a split resource icon out of resource centric interface.
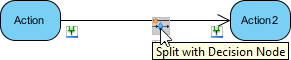
Select a split resource icon - As a result, an extra shape is inserted between two existing shapes.

Control Flow is split by Decision Node NOTE: There is an orange asterisk on the split resource icon.
Group selection resource
When a great amount of shapes are displayed on the diagram disorderly, resource centric interface can support alignment and grouping after selecting several shapes.
- Select several shapes on diagram.
- Move the mouse on the last selected shapes and group selection resources will be shown instantly.
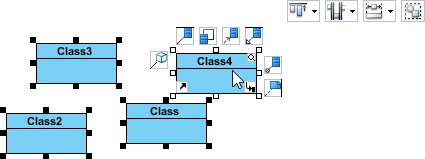
Group Selection Resources are shown - Press the reversed triangle of Align Top and select an alignment option from the drop-down menu.
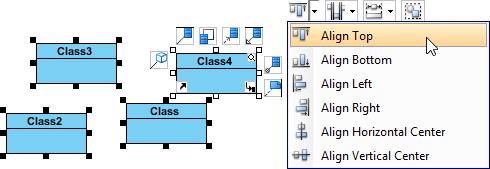
Select Align Top from the drop-down menu
Related Resources
The following resources may help you to learn more about the topic discussed in this page.
| 5. Master view and auxiliary view | Table of Contents | 7. Tagged Values |