Perform scenario-based wireframing
Showing a screen flow of the system to your customer guarantees your customer knows what will be delivered by the end of the project. This also saves us a lot of efforts in modifying the system in later stage of the development process because customer is involved and informed in early time. Instead of doing heavy system prototyping, you can "sketch" the user interface by wireframes. You can either sketch a new wireframe or reuse existing wireframes in each step of your scenario. The wireframe shows "just enough" information of the screen instead of the full details. The actual screen design will be produced at a later stage by referencing the wireframe.
By performing scenario-based wireframing, you can present your scenarios to your customer visually to obtain consent to the requirements easier.
Creating a wireframe for a step in scenario
To create a wireframe for a step in scenario:
- Access the user story scenario of a user story.
- Click on the step that you want to create a wireframe.

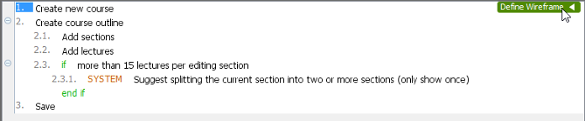
Selected a step in user story scenario - Move the mouse pointer over the Define Wireframe button (i.e. the green button) on the bottom-right of the step. Click on it.
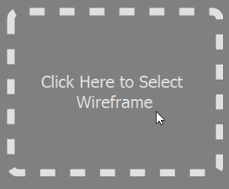
Define a wireframe for a scenario step - This shows a gray pane on the right hand side. Click on it to select a kind of wireframe to create.
Select a wireframe - In the popup window, select the suitable type of device/platform for your application/system. If your system will run on multiple devices/platforms, please consider creating multiple scenarions.
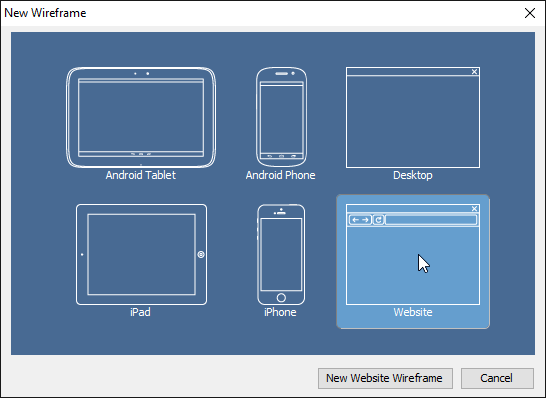
Select a type of wireframe to create - Click New %TYPE% Wireframe where %TYPE% is the type of device/platform you selected.
- A blank, new wireframe appears and you can now begin editing.
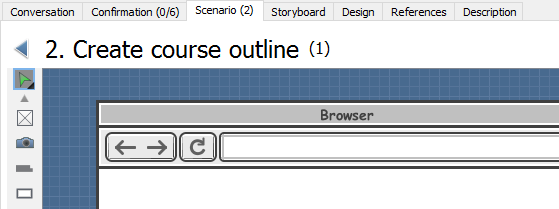
New wireframe created - When you have finished editing, you can go back to the scenario by clicking on the back button on top of the wireframe.

Go back to the scenario
The above are the steps that involve in creating a wireframe from a scenario step when there is no wireframe in your project. Once you have created a wireframe, you will see something different after step 5, when you attempt to create a wireframe for another scenario step. Here is what you will see:
 |
| Wireframe selection |
If you want to create an entirely new wirefram:
- Click on the New Wireframe button.

To create a new wireframe - The remaining steps are same as those mentioned above, starting from step 5.
If you want to create a new wireframe and you found that an exising wireframe is more or less the same as what you want to draw, you may create what we called a 'child state' of that existing wireframe.
- Double click on the wireframe to treat as a base in creating a new wireframe.
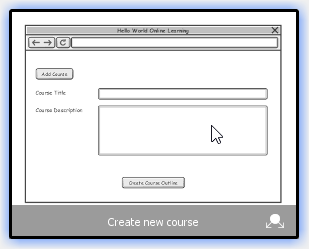
Selecting a wireframe - This shows the available states of the wireframe. Select the state that looks closest to what you want to draw.
Selecting a wireframe state - Click on Create Child State.
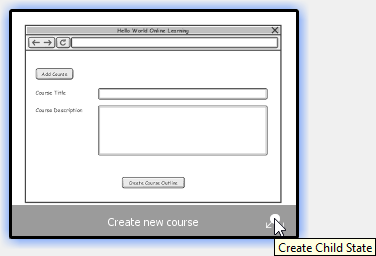
Create Child State - Edit the new wireframe (state). When you finish editing, go back to the scenario by clicking on the back button on top of the wireframe.
Selecting an existing wireframe for a step in scenario
Sometimes, you may want to re-use a wireframe created earlier. For example, to reuse a wireframe about account login in scenarios that require user to login to do something.
To select an existing wireframe for a step in scenario:
- Access the user story scenario of a user story.
- Click on the step that you want to associate a wireframe with it.
Selected a scenario step - Move the mouse pointer over the Define Wireframe button (i.e. the green button) on the right hand side of the step. Click on it.
- This shows a gray pane on the right hand side. Click on it.
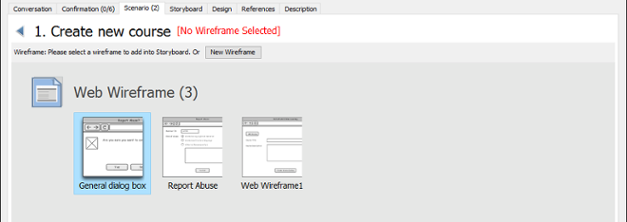
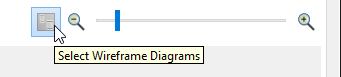
Select a wireframe for step - Click on Select Wireframe Diagrams.
Select an existing wireframe diagram - Double click on the wireframe.
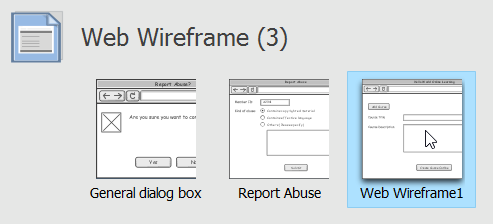
Selecting a wireframe - This shows the available states of the wireframe. Select the state of wireframe to add into your scenario step.
Selecting a wireframe state - Go back to the scenario by clicking on the back button on top of the wireframe.

Go back to scenario
Adding extra wireframes to a step
If what you have written as a step of a scenario involves more than one screen change, you may need to add multiple wireframes to that step.
To add extra wireframes to a step:
- Access the user story scenario of a user story.
- Click on the step that you want to add an extra wireframe to it.
- Move the mouse pointer over the Show Wireframe button (i.e. the green button) on the right hand side of the step. Click on it.
- There is a button under the thumbnail of the existing wireframe. Click on it and select Add... from the popup menu.

Add a wireframe to a scenario step - If you want to select another state of the selected wireframe, just select it in the overview of states.
Selecting a wireframe state
If you want to select another wireframe, click on Select Wireframe Diagrams button.
Select a wireframe
Then, double click on the wireframe.
This shows the available states of the wireframe. Select the state of wireframe to add into your step.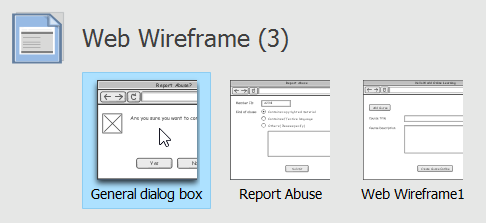
Select a wireframe
Selecting a wireframe state - Go back to the scenario by clicking on the back button on top of the wireframe.
Using pointer / finger gesture
You can indicate in wireframe the position of mouse pointer, or the finger gesture required to execute an action. To do this:
- Access the user story scenario of a user story.
- Click on the step that you want to edit its wireframe.
- Move the mouse pointer over the Show Wireframe button (i.e. the green button) on the right hand side of the step. Click on it.
- There is a button under the thumbnail of the existing wireframe. Click on it and select Pointer/Drag/Finger Gesture from the popup menu. Note that Pointer and Drag are available for Desktop and Web wireframe, while Finger Gesture is available for Android phone, Android tablet, iPad and iPhone wireframes.
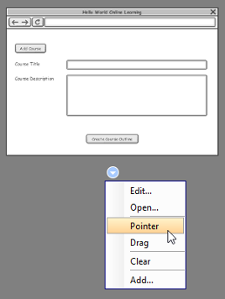
Add a pointer to wireframe - Drag on the pointer/drag/finger gesture symbol to reposition it.
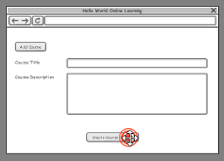
Repositioning a pointer
Removing a wireframe from a step
To remove a wireframe from a step:
- Access the user story scenario of a user story.
- Click on the step that you want to remove a wireframe from it.
- Move the mouse pointer over the Show Wireframe button (i.e. the green button) on the right hand side of the step. Click on it.
- There is a button under the thumbnail of the existing wireframe. Click on it and select Remove from the popup menu..
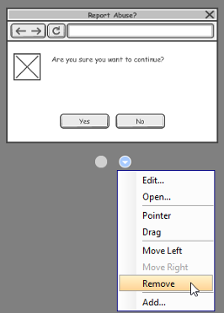
Remove a wireframe
Related Resources
The following resources may help you to learn more about the topic discussed in this page.
| 11. Using user story scenario | Table of Contents | 13. Wireframe playback |