Publish project using Project Publisher

The Project Publisher is a tool that exports the project, including detailed information in diagrams and models into interactive and well-organized web pages. The generated web pages can be read in any web browser with no additional plug-in required, so collaborative partners may see the published product even if they do not have Visual Paradigm products installed.

To launch Project Publisher:

  1. Select Tools > Publish Project... from toolbar.
  2. In the Project Publisher window, specify the output directory where you want to save the published content.
  3. You can optionally configure the publisher by adjusting the options or options. For details, refer to the sections below.
  4. Click OK button to start publishing.

An overview of Project Publisher

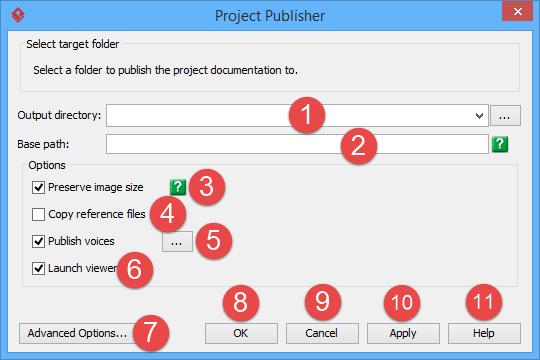
Overview of project publisher
No. Name Description
1 Output directory The folder where you want to publish the content to.
2 Base path If a base path is specified and then published files are moved to the base path, diagram and model element can be accessed directly with a dedicated link.
3 Preserve image size When checked, published content will show images in exact width and height.
4 Copy reference files You can add file references to model elements. When this option is checked, referenced files will be copied to the output directory, so that you can access for any referenced file when browsing the published content in other machine easily.
5 Publish voices When checked, audio clips added to the description will be published and can be opened when browsing the published outcome.
6 Launch viewer When checked, the system will launch the web browser and open the published Web contents.
7 Advanced options Click to configure advanced publisher options. For details about the options, read the next section.
8 OK Click to publish.
9 Cancel Click to close the dialog box without publishing.
10 Apply Click to save the changes of settings.
11 Help Click to open Help contents.
Description of project publisher

Advanced options

On the Project Publisher dialog box, you can configure some of the common options. You can also configure the advanced options for more detailed settings by clicking the Advanced Options... button.

Option Description
Generate model element list in diagram page
Check to generate a list of model element in a diagram page.
Generate only description in model element page
Check to generate only description in model element page and exclude other contents.
Generate only when description is defined
Generate element page only when that element has description. When this option is off, the shape will have no linkage from image in diagram page due to the absent of element page.
Generate page header Check to generate the pre-defined header.
Generate page footer Check to generate the pre-defined footer.
Show description when hover over a shape

Check to show element's description when moving the mouse pointer over a shape in an image of diagram.

Show procedure for BP task and sub-process - Popup the working procedures when you move the mouse pointer over BPMN tasks and sub-processes in an image.

Show test plan for test case - Popup the test plan when you move the mouse pointer over a test case in an image.

Generate diagram type Check to generate the diagram type in addition to diagram name.
Remove paragraph's top and bottom margin in RTF description By default, top and bottom margins are added above and below RTF description text, due to the default style applied to the RTF description. If you want to remove the margins, you can override the setting by unchecking this option.
Generate referenced project diagrams Check to include contents for diagrams in referenced project.
Generate quality information Quality of model is assessed during the modeling. If you want to see the comment for each of your model elements, check this option to include in document.
Overwrite document style sheets Project publishing is an "overwrite" action. If you publish to the same folder twice, files produced the first time would be overwritten. This option enables you to keep the style sheets file (.css) without being overwritten. This enables you to edit the styles defined and re-use it in subsequent publishing.
Generate grid configuration Check to include configuration for grids, such as the type of elements to list and the scope (e.g. project/model/diagram, etc)
Generate menu By default a diagram and model menus are shown on the left hand side of the published outcome. You can decide whether or not to generate the menus or produce two index files, one with menu and another one without.
Always show indicators Indicators refer to the small icons that show over shape(s) in image(s). They appear to reflect different status of the view or model element - Is description entered? Is it a master or auxiliary view? Is sub-process/reference added? Is it a referenced element?
Drill down effect for general models Choose the action when pressing on model elements on a diagram.
Drill down effect for business sub-process Choose the action when pressing on sub-processes on a diagram.
Drill down effect for process (Process Map) Choose the action when pressing on processes on a process map diagram.
Drill down effect for events (BPMN) Choose the action when pressing on (BPMN) events on a diagram.
Drill down effect for diagram overview Choose the action when pressing on diagram overviews on a diagram.
Drill down effect for action Choose the action when pressing on (activity diagram) action on a diagram.
Drill down effect for UI elements Choose the action when pressing on UI elements (e.g. Frame, Panel, Button) on a diagram.
Publisher engine Choose the engine for publishing. You are advised to use the new engine.
Default diagram

Choose the diagram that first appear when the published content is opened. If unspecified, a default page with project information will be presented.

Sort elements in type groups by Choose the way of sorting elements to be shown in summary or drop down menu in diagram page
Filtered content Choose the content for not to show in published content
Description of project publisher advanced options

Related Resources

The following resources may help you to learn more about the topic discussed in this page.

 
Chapter 1. Publishing project to Web Site Table of Contents 2. Using the published contents

We use cookies to offer you a better experience. By visiting our website, you agree to the use of cookies as described in our Cookie Policy.OK