Refactoring
Refactoring refers to the action to move project data like diagrams and/or model elements between projects that have a reference relationship in between.
Refactoring diagrams and/or model elements to another project helps in the re-structuring of project and re-organizing project data. Through refactoring, generic project data is moved to a project file, generally known as a library project, readily for other project files to access through project referencing, such that they can get the common project data included without the need of re-definition. Another benefit of refactoring is that it guarantees the correctness of model definition by enforcing common project data to be defined just once. This is also, in fact, the benefit of using project reference.
Let's say, for example, you are modeling a vehicle maintenance company. You have created two projects for the distinct parts of the business - Car washing and car repair. When modeling car washing with class diagram, you have found that classes like Car and Manufacturer are also needed by the car repair model. You then refactor them to a referenced project so that the car repair model can link with it and have the classes included.
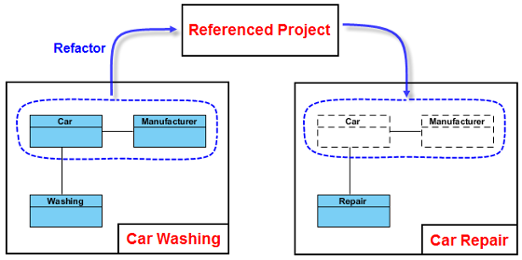 |
| What is refactoring? |
Refactoring also works in the opposite way, that is, to move diagram/model elements from the generic library project back to the 'consumer' project that use the data. While it is not so common, you may need it when you discover that certain diagram or model element in the generic project is not really that general, and you want to move the diagram/model element back to the only, specific project that use it.
How to refactor?
Keep in mind that refactoring only works with projects that have a reference in between. If you want to refactor diagram or model element to a library project but such project is either not existing or not a referenced project of your source project, get ready for the project and the source project reference to it. If you are unclear about project referencing, please read the previous chapters.
Refactor model elements to reference project
- Open the Model Explorer by opening the View tab of the toolbar and selecting Panes > Model Explorer to show it.
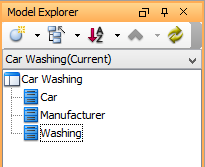
Model Explorer - Select and right click on the model elements you want to refactor to referenced project. Select Refactor to Referenced Project... from the popup menu.
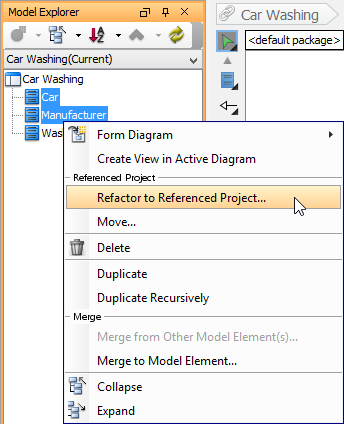
Refactor classes - You are prompted for saving project. Click Yes. If you click No, refactor will stop.
- If the Include Related Diagrams window appears, this means that one or more of the selected elements has been visualized in at least one diagram (as listed on the left of window) with master view created.
Here you may take any of the following actions to continue.- Include the diagrams - Click Include Diagram(s) at the bottom right corner. This will move not only the model elements but also the diagrams listed on the left hand side of window to the referenced project. Since the action is not undoable, think carefully before continuing.
- Remove the master views - Click Stop Refactor at the bottom left corner. Open the diagrams where the master views of the selected model elements exist. Delete them. When delete, make sure you are deleting the VIEW instead of model element. Once all master views are removed, re-run step 1.
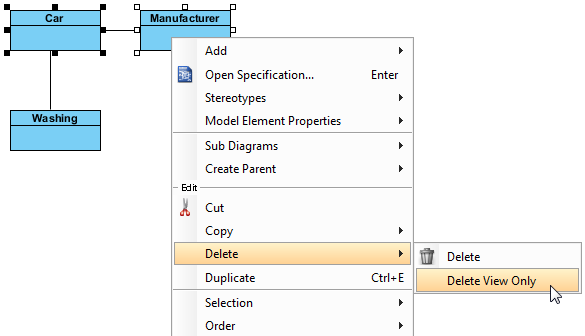
Delete only views of element, not model elements
- Refactor not only moves the selected elements to referenced project, but also those related elements. Here are two examples:
- Connectors that connect between the selected elements.
- Class being selected as type of attribute of selected class.
Elements to refactor (including those related elements) - Once the refactoring is completed, the project will reopen itself. From now on, you can access and use the refactored elements through the Model Explorer. Select the referenced project under the drop down menu. Drag to diagram the element(s) to use.
Note that auxiliary views of refactored elements are now referencing the elements in referenced project.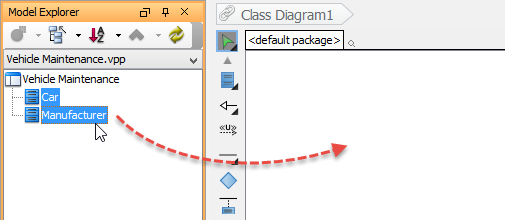
To re-use referenced classes on current project
Refactor diagram to reference project
To refactor diagram means to refactor the diagram as well as the elements on the diagram. As the steps are pretty close to refactoring model element, as described above, please read refactor model elements before reading this section.
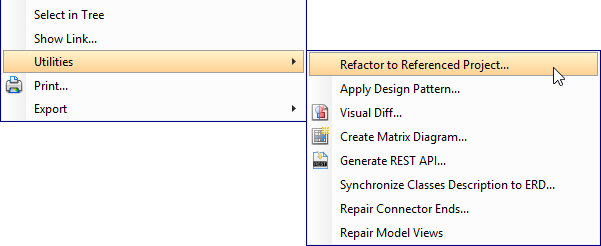
- Right click on the diagram that you want to refactor and select Utilities > Refactor to Referenced Project... from the popup menu.
Refactor a class diagram - You are prompted for saving project. Click Yes. If you click No, refactor will stop.
- If the Include Related Diagrams window appears, this means that one or more of the elements in the selected diagram has been visualized in another diagram (as listed on the left of window) with master view created. Read step 4 in the previous section to learn how to resolve the relationships.
- Refactor not only moves the selected elements to referenced project but also those related elements. Read step 5 in the previous section to learn how to carry on.
- Once the refactoring is completed, the project will reopen itself. From now on, you can access and use the refactored elements through the Model Explorer. Select the referenced project under the drop down menu. Drag to diagram the element(s) to use. Note that auxiliary views of refactored elements are now referencing the elements in referenced project.
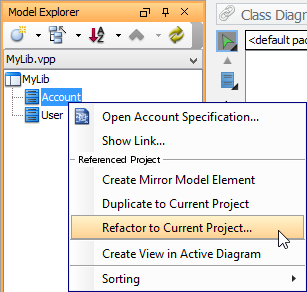
Refactor model elements from reference project
- Open the Model Explorer by opening the View tab of the toolbar and selecting Panes > Model Explorer to show it.
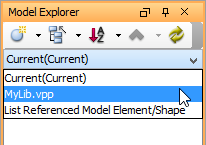
- Click on the drop down menu at the top of the Model Explorer and choose the reference project that contains the model element(s) you want to get.
Browsing model elements in reference project - Select and right click on the model elements you want to get from the reference project. Select Refactor to Current Project... from the popup menu.
Refactoring a class - You are prompted to a note with some points you should pay attention to before continue. Let's revise them in brief here:
- Refactoring cannot be undone.
- Project will be saved before refactoring.
- Make sure all the 'related project files' are in your workspace folder, or any sub-directory under the workspace folder. 'Related projects' means the project files that are referencing the current or reference project, either with a direct reference (project A references B) or a transitive reference (project A references A1, A1 references B). Refactoring will scan through the project files in (and only in) your workspace. The reason is that the model element(s) you attempt to refactor might be in-used by another project file. Refactoring may need to modify such project by adding/updating the project and element reference, or to stop you from continuing if a potential error may occur.
- If you work as a team, and are using a version control system (VPository/Teamwork Server/Other repository types), make sure the 'related projects' are all checked out. Refactoring will not and cannot detect the project files in your server.
- Click Yes to continue.
- You are prompted to preview the changes. Click Yes if you want to preview changes. If you click No, refactoring will continue. If you click Cancel, refactoring will be cancelled.
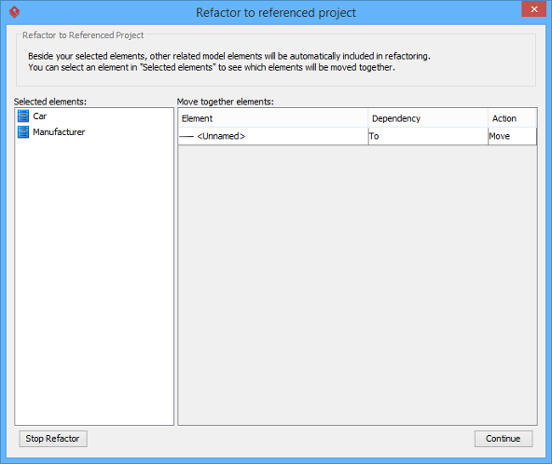
- If you clicked Yes, you see the window below, listing out the items to be refactored and the actions that will be performed after the refactoring.
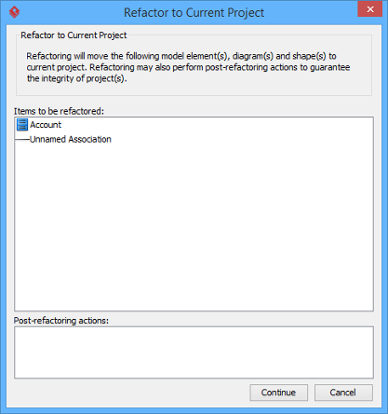
Previewing changes
Refactor not only moves the selected elements to referenced project but also those related elements. Here are several typical cases:- Connectors that connect from/to the selected element.
- Model elements that takes the selected element as type (e.g. If class 'X' has an attribute 'Xa', which has the selected element as type, class 'X' will be refactored).
- Member-typed elements (e.g. Refactoring a class will cause its attributes and operations to be refactored. Refactoring an entity will cause its columns to be refactored).
Notice that the searching of relevant project data is done recursively, meaning that whenever a model element is found relevant to any element selected to be refactored, that element will undergo the same checking performed to look for the other relevant elements, until the end. If you accept the changes, click Continue at the bottom right corner to continue. Otherwise, click Cancel at bottom right to terminate the refactoring.
- Once the refactoring is complete, the project will reopen itself. The refactored element is now in your project. You can find them in the Model Explorer.
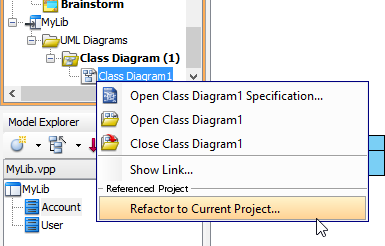
Refactor diagram from reference project
To refactor diagram means to refactor the diagram as well as the shapes on the diagram. As the steps are pretty close to refactoring model element, as described above, please read refactor model elements before reading this section.
- In Diagram Navigator or Model Explorer, locate the diagram you want to get from reference project. If either the Diagram Navigator or the Model Explorer is hidden, show it by opening the View tab of the toolbar and select Panes > Diagram Navigator or Panes > Model Explorer to show it.
- Right click on the diagram node and select Refactor to Current Project... from the popup menu.
Refactor class diagram - Click Yes when you are prompted to the note.
- You are prompted to preview the changes. Click Yes if you want to preview changes. If you click No, refactoring will continue. If you click Cancel, refactoring will be cancelled.
- Refactor not only moves the selected elements to referenced project but also those related elements. If you clicked Yes, read step 6 in the previous section to learn how to carry on.
- Once the refactoring is completed, the project will reopen itself. The refactored diagram is now in your project. Notice that the shapes in diagram should be referencing the model elements in reference project.
Related Resources
The following resources may help you to learn more about the topic discussed in this page.
| 5. Duplicating element from referenced project | Table of Contents | Chapter 2. Model element nicknaming |