Status of a user story
A user story can be in any of the following six statuses, from the moment when a user story has been identified, until the requirements associated with the story have been implemented and confirmed working.
|
|||||||||||||||||||||
| Description of user story statuses |
Color code of user story
Each status is associated with a color code. User story in a particular status will have its title bar painted in the color associated with that status. The following image shows two user stories, one in Todo and another in Developing state. As you can see their title bar are painted in different colors.
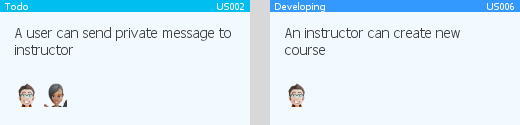 |
| User stories in different statuses (Todo and Developing) |
Setting the status of user story
To set the status of user story:
- Locate the user story first. Here are some of the typical ways to locate a story.
- If you own the URL of a user story, open the URL by selecting Diagram > Link from the toolbar. Paste the URL in breadcrumb in press Enter.
- To locate a user story in a particular use case, open the use case by selecting UeXceler > Use Case first. Find the story under the User Stories tab on the right hand side.
- To locate a user story in a sprint, open the sprint from the UeXceler > Sprint page and find the story there.
- You can also find a user story in the UeXceler > User Story page. Note that if your story was added into a sprint, you have to enable the In Sprint option in the Advanced Filter.
- Open the story by double clicking on it.
- Open the Description tab.

Opening the Description tab - At the bottom right corner of the page, click on the dropdown menu of Status and select the status you want.
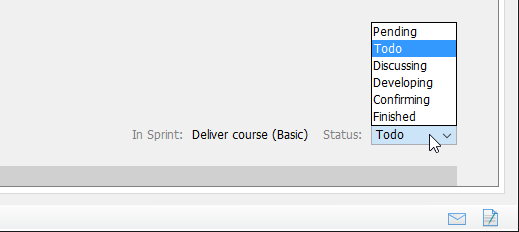
To select a status for a user story
Configuring user story statuses
The six default statuses are typical for most scrum projects. If you want to introduce new statuses, or to remove the statuses we provided, configure them. Note that the configuration of statuses is project based. If you want to use the same set of user story statuses in different projects, you need to configure in each of these projects. To configure user story statuses:
- Select Window > Configuration > Manage User Story Statuses... from the toolbar.
- In the Manage User Story Statuses window, the statuses available for selection are listed on the left hand side, with their properties like their name, color code, description, entry condition and user story attributes listed on the right hand side. You can add a new status by clicking Add and filling in its details. If you want to remove a status, select it on the left and click Remove. Note that a removal of status is allowed only when it has not been selected by any user story. Besides, there must be at least one status left.
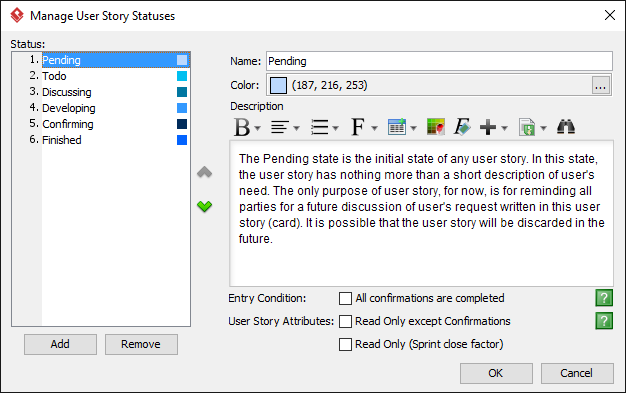
The Manage User Story Statuses window
Description
Description is the definition of a user story status. The description entered here will be shown in Kanban Board as a tooltip of status column.
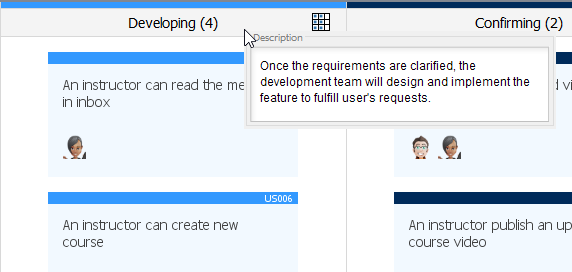 |
| Description of user story as tooltip in Kanban Board |
Entry Condition
Specify the conditions required for setting a user story to be in this status. For example, when All confirmations are completed is checked, you can only set a user story to be in this status when all of its confirmation items are checked.
User Story Attributes
The selected attributes will be applied to the user stories in this status.
|
||||||
| Description of user story attributes |
Related Resources
The following resources may help you to learn more about the topic discussed in this page.
- Visual Paradigm Know-How - Tips and tricks, Q&A, solutions to users' problems
- Contact us if you need any help or have any suggestion
| 2. Writing user story in use case basis | Table of Contents | 4. Performing estimation on a user story |