
User story mapping is a collaborative visualization technique that helps product teams understand the user journey, prioritize work, and plan releases effectively. Developed by Jeff Patton, this approach transforms abstract requirements into actionable development plans while keeping the user's perspective at the center.
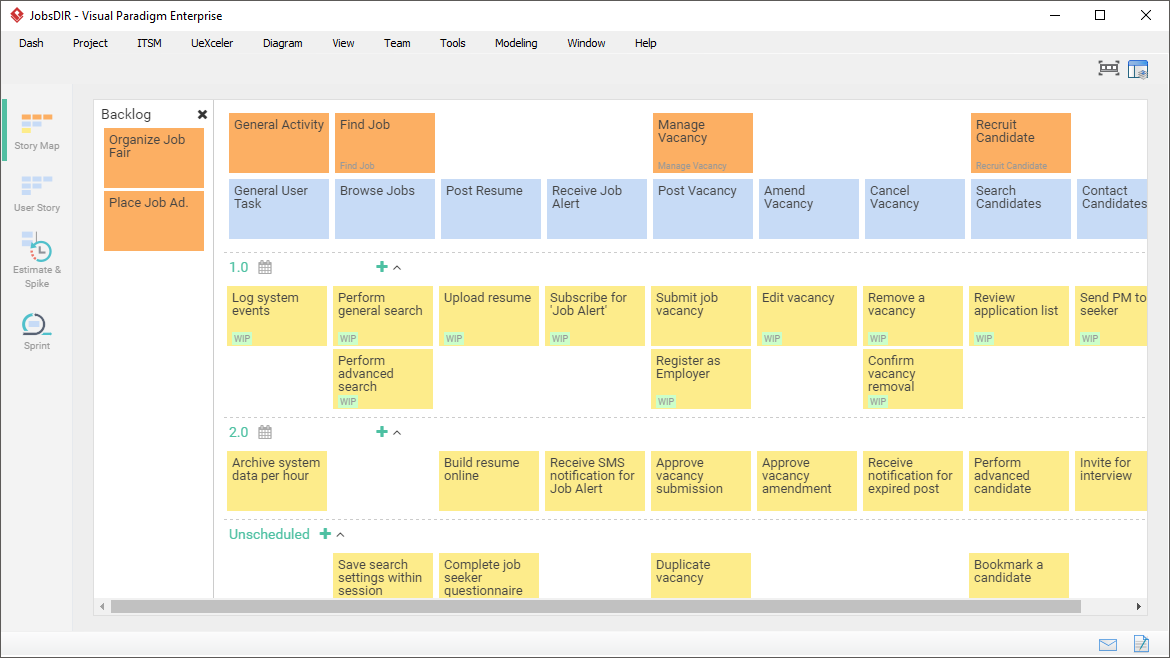
Unlike traditional backlog management, story mapping provides context and structure, making it easier for cross-functional teams to align on what to build and why.
Flat lists lack context and hierarchy
Difficult to see the big picture
Prioritization becomes arbitrary
Stakeholders struggle to understand value delivery over time
Visualizes the complete user journey
Creates shared understanding across teams
Enables strategic release planning
Keeps focus on user outcomes, not just features
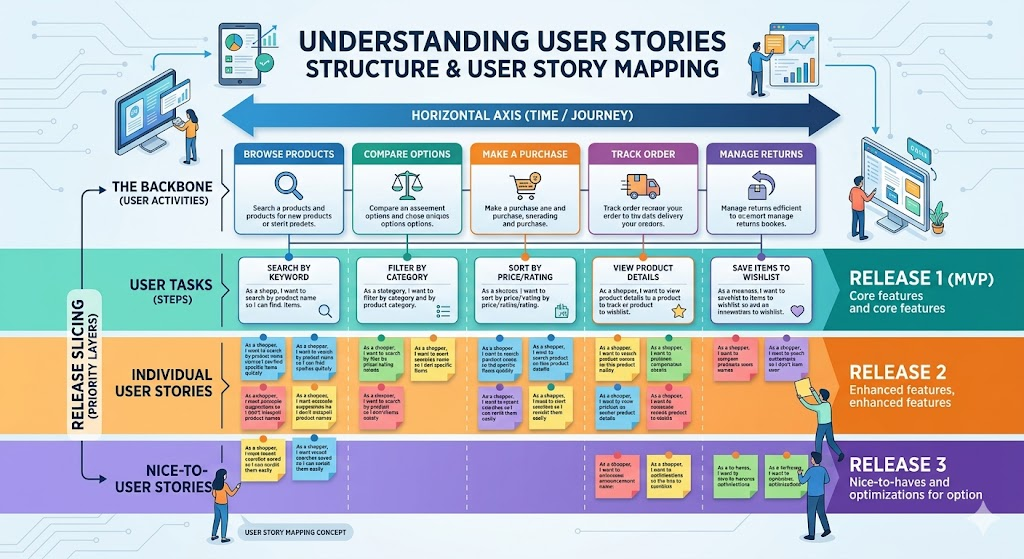
The backbone represents high-level user activities or goals—the major steps users take to accomplish something meaningful. These form the horizontal axis of your map and answer: "What are the main things users do?"
Example for an e-commerce platform:
Browse products
Compare options
Make a purchase
Track order
Manage returns
Beneath each activity are the specific tasks users perform. These break down activities into concrete actions and provide more detail about how users achieve their goals.
Under "Browse products":
Search by keyword
Filter by category
Sort by price/rating
View product details
Save items to wishlist
At the lowest level are individual user stories—the smallest units of functionality that deliver value. These follow the standard format:
"As a [type of user], I want [goal] so that [benefit]."
Under "Search by keyword":
As a shopper, I want to search by product name so I can find specific items quickly
As a shopper, I want autocomplete suggestions so I don't misspell product names
As a shopper, I want recent searches saved so I can revisit them easily
Stories are organized vertically into release slices based on priority and value. This creates a walking skeleton—a minimal viable version—followed by subsequent releases that add depth and breadth.
Release 1 (MVP): Core functionality needed to deliver basic value
Release 2: Enhanced features that improve experience
Release 3: Nice-to-have features and optimizations
Before mapping, clarify:
Who are we building for?
What problem are we solving?
What is the scope of this initiative?
Gather key stakeholders: product managers, designers, developers, QA, and business representatives.
Start with broad user goals. Ask: "What are the major things our users need to accomplish?"
Facilitation tips:
Use sticky notes (physical or digital)
Write one activity per note
Arrange left to right in chronological or logical order
Keep activities at the same level of abstraction
Example for a project management tool:
[Create Project] → [Add Team Members] → [Plan Work] → [Track Progress] → [Report Results]
For each activity, identify the specific steps users take. Place these beneath the corresponding activity.
Under "Create Project":
Enter project name
Select project template
Set start/end dates
Choose visibility settings
Add project description
Decompose tasks into granular user stories. Each story should be:
Independent: Can be developed separately
Negotiable: Details can be discussed
Valuable: Delivers user or business value
Estimable: Team can size it
Small: Fits within a sprint
Testable: Clear acceptance criteria exist
Under "Enter project name":
As a team lead, I want to name my project so I can identify it in my dashboard
As a team lead, I want character limits enforced so names remain readable
As a team lead, I want duplicate name warnings so I don't create confusion
Now comes the critical step: deciding what to build first.
Prioritization criteria:
User value and pain points
Business objectives
Technical dependencies
Risk reduction
Learning opportunities
Slicing strategy:
Walking Skeleton: Identify the absolute minimum needed for each activity to function end-to-end
Release 1: Core features that deliver primary value
Release 2+: Enhancements, edge cases, optimizations
Draw horizontal lines across your map to delineate releases. Everything above the line is in that release; everything below is deferred.
Review the map with stakeholders:
Does this cover all critical user journeys?
Are there gaps or redundancies?
Is the MVP truly viable?
Do releases make strategic sense?
Adjust as needed before committing to development.
[Discover Restaurants] → [Browse Menu] → [Place Order] → [Track Delivery] → [Rate Experience]
Activity: Discover Restaurants
Tasks:
Search by cuisine type
Filter by distance
Filter by rating
View promotions
See estimated delivery time
Stories under "Search by cuisine type":
As a hungry user, I want to search by cuisine (Italian, Mexican, etc.) so I can find food I'm craving
As a user, I want to see popular cuisines highlighted so I can discover new options
As a user, I want to save favorite cuisines so I can filter quickly next time
Activity: Place Order
Tasks:
Select items and quantities
Customize order (add/remove ingredients)
Apply promo codes
Choose delivery address
Select payment method
Review and confirm
Release Slicing:
Release 1 (MVP):
Basic item selection
Single delivery address
One payment method
Order confirmation
Release 2:
Item customization
Multiple addresses
Promo code support
Order notes to restaurant
Release 3:
Saved payment methods
Scheduled deliveries
Group ordering
Split payments
Begin with high-level activities before diving into details. This prevents premature optimization and keeps the team focused on user goals.
Story mapping is a team sport. Include diverse perspectives:
Developers identify technical constraints
Designers ensure usability
QA thinks about edge cases
Business stakeholders clarify priorities
Display your story map prominently—in a war room, on a shared digital board, or in documentation. Reference it regularly during planning and refinement.
Your story map is a living artifact. Update it as you:
Learn from user feedback
Discover new requirements
Complete releases
Pivot strategy
Don't try to map every possible scenario upfront. Focus on the happy path first, then add variations and edge cases in later releases.
Organize releases around timeboxes (e.g., quarterly) rather than feature completeness. This creates predictable delivery rhythms and manages stakeholder expectations.
Each story on your map should translate directly into backlog items. Maintain traceability so you can track progress against the map.
Story maps evolve. Revisit them regularly to incorporate learnings and adjust priorities.
Resist the urge to write every possible story upfront. Map enough to plan your next 2-3 releases, then refine as you go.
While user stories drive the map, don't forget infrastructure, security, and technical debt. Create parallel tracks or integrate technical enablers where appropriate.
If your map isn't influencing decisions and conversations, it's just wallpaper. Use it actively in planning, refinement, and stakeholder updates.
Always test your assumptions. Talk to real users, prototype key flows, and validate that your map reflects actual user needs.
How do you know your story mapping is working?
Leading indicators:
Team alignment on priorities
Reduced rework and scope changes
Faster decision-making in refinement
Stakeholders can articulate the product vision
Lagging indicators:
On-time release delivery
User satisfaction scores
Feature adoption rates
Reduced time-to-market
Keep it lightweight. A whiteboard session with sticky notes may be all you need. Focus on the next release, not the entire product roadmap.
Consider multiple maps at different levels:
Portfolio level: Strategic initiatives and epics
Product level: Full user journey mapping
Team level: Detailed stories for upcoming sprints
Ensure maps connect hierarchically so work aligns across levels.
Use digital collaboration tools with sticky note functionality, voting features, and real-time editing. Record sessions for asynchronous review.
Add compliance and audit trails to your map. Tag stories with regulatory requirements and ensure proper documentation flows through releases.
You don't need special training or expensive software to begin story mapping:
Pick a current initiative with clear user value
Gather 5-8 key stakeholders for a 2-3 hour workshop
Prepare materials: Sticky notes, markers, wall space (or digital equivalent)
Follow the six steps outlined above
Create your first release slice and commit to delivering it
Review and iterate after each release
User story mapping transforms how teams think about product development. By visualizing the user journey, breaking work into manageable pieces, and strategically planning releases, you create clarity, alignment, and momentum.
The power of story mapping isn't in the artifact itself—it's in the conversations it enables, the shared understanding it builds, and the user-centric mindset it reinforces. Start small, stay collaborative, and let your map evolve as you learn.
Your users don't care about your backlog. They care about whether your product helps them achieve their goals. Story mapping keeps that truth front and center.
User Story Mapping by Jeff Patton (the definitive guide)
Agile Alliance resources on agile planning techniques
Community forums and meetups focused on product discovery
Case studies from companies practicing continuous discovery
Remember: The best story map is the one your team actually uses. Start mapping, keep iterating, and watch your product development transform.

