How to Draw a Mind Map?
Mind Mapping Diagram is a simple, yet powerful diagram to help organize concepts and ideas through a visual note-taking approach. By presenting ideas in a networked form, user can develop precise ideas much easier.
There are no restrictions on the usage of a Mind Mapping Diagram. It can be used for making business decisions, preparing meeting agendas, story planning, or any aspect of our lives that requires effective thinking. In this tutorial, you will learn to draw a Mind Mapping Diagram in Visual Paradigm. We will also cover some of the typical shortcut keys that you can use to draw a mind map faster and easier.
Creating a Mind Mapping Diagram
- Create a new project with Visual Paradigm. Select Project > New from the application toolbar.
- In the New Project window, enter Tutorial as the project name. Click the Create Blank Project button.

- Select Diagram > New from the application toolbar.
- Select Mind Mapping Diagram and click Next.

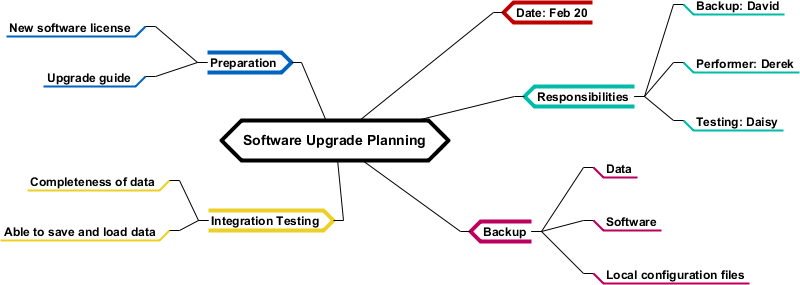
- Enter Software Upgrade Planning as the diagram name and click OK to confirm. This creates a mind mapping diagram with a key idea node presented. Let's say you want to record the date to perform the software upgrade. Let's create a branch from the central idea node.

- Move your mouse pointer over the central idea node.

- Click on the resource icon Branch -> Node and drag it out.

- Release the mouse button and enter Date: Feb 20 as the node content.

- Let's say you want to record the responsibilities of team members. First, create a node Responsibilities from the central idea node.

- We can create sub-nodes under the Responsibilities node. Let's create three nodes: Backup: David, Performer: Derek, and Testing: Daisy from the central idea node.

- Apply the same technique to complete the mind map. Make it look like the one below:
Relating Nodes
Nodes that are related can be connected with a Link connector. Let's try to connect the node Integration Testing and Testing: Daisy.- Move your mouse pointer over the node Integration Testing.

- Click on the resource To Link -> Node and drag to the node Testing: Daisy.

- Release the mouse button and adjust the curve to make the diagram look tidier.

Using Icons
A set of built-in icon images is provided for you to add to mind map nodes to make the diagram more expressive. Let's try.- Move your mouse pointer over the node Responsibilities.

- Click on the resource icon Format and then select Icons... from the popup menu.

- In the Select Icons window, choose Businessman and click >. Click OK.

The icon is added to the mind map node.
Using Shortcuts
Besides creating nodes through the resource-centric interface, you may also create them through shortcuts (hotkeys). This way of creating nodes will make it smoother when drawing the mind map by only using one input device, the keyboard. Here are some of the shortcuts that you can use in a mind mapping diagram:| Shortcut Key | Description |
|---|---|
| Insert | Create a sub-node. |
| Shift-Insert | Create a parent node. |
| Enter | Create a sibling node below the selected node. |
| Shift-Enter | Create a sibling node above the selected node. |