Eclipse Tutorial: How to Access Database WITHOUT SQL?
Object relational Mapping (ORM) is a way to virtually map Java objects with relational database to aid in object-oriented programming and Hibernate is one of the most popular ORM framework on the market. With Visual Paradigm Eclipse Integration, you can have an all-in-one modeling plugin for your Eclipse, one of the most popular IDE on the market. You can design system with UML diagrams and design database with ERD tool. You can also generate database and executable Java Hibernate source code out of your diagrams.
Object-Relational Mapping (ORM) is a technique for virtually mapping Java objects with a relational database to aid in object-oriented programming, and Hibernate is one of the most popular ORM frameworks on the market. With Visual Paradigm Eclipse Integration, you can have an all-in-one modeling plugin for your Eclipse, one of the most popular IDEs on the market. You can design systems with UML diagrams and design databases with the ERD tool. You can also generate the database and executable Java Hibernate source code from your diagrams.
Getting Started
We assume you have SQL Server, Eclipse, and Visual Paradigm installed. Now, let's get started. First, we will create a database in our SQL Server.
Set up Your Database
To set up a database in SQL Server:
- Log in to your SQL Server via Microsoft SQL Server Management Studio.

- Right-click on the Databases node in Object Explorer and select New Database... from the popup menu.

- Enter the name of the database. In this tutorial, we name the database ToyStore.

- Click OK to create the database.
Creating a Java Project in Eclipse
- Start the Eclipse IDE.
- Click the New button in the Application Toolbar and select Java Project to open the New Java Project window.

- In the New Java Project window, enter Toy Store in the Project name field.

- Click Finish to create the project.
Starting Visual Paradigm in Eclipse
Now, we need to start Visual Paradigm in Eclipse.
- Right-click on your Java project and select Open Visual Paradigm from the popup menu.

- You may be prompted to specify the location of your Visual Paradigm project. In this case, simply select Create in default path and click OK to proceed.

- When you are prompted to switch to the Modeling perspective, choose Yes.

Configure the Database for Your Eclipse Project
Before modeling starts, we need to specify the database configuration for our project.
- Select Modeling > ORM > Database Configuration... from the main menu.

- Select MS SQL Server from the database list.

- Select 2008 or higher in the Version field.

- Leave the Driver field unchanged (selecting jDTS Driver), then press the green down arrow button to download the required driver. You may need to specify your proxy server for accessing the Internet and downloading the driver.

- Next, fill in the hostname, port number, Database name, as well as your User name and Password to access the database.

- Click Test Connection to make sure the connection settings you defined are correct.
Now, everything is ready, and we can start creating our data model.
Create a Data Model with ERD
We can start creating a data model for our project.
- Right-click on Entity Relationship Diagram in Diagram Navigator and select New Entity Relationship Diagram from the popup menu.

- Select Entity in the diagram toolbar and click on the diagram to create an entity. Name it Category.

- Right-click on the entity and select New Column.

- Enter +ID : int to create a primary key with ID as name and int as type.

- Press Enter to confirm and create one more column. Enter name : varchar(255) as the column name. Press Enter again to confirm and press Esc to cancel editing.

- Move the mouse pointer over the Category entity. Click on the Resource Catalog icon at the top right.

- Release the mouse button and select One-to-Many Relationship -> Entity from the Resource Catalog.

- Name the entity Product.
- Create three columns for Product: +ID : int as the primary key, name : varchar(100) for the name of the products, and stockQTY : int for the availability of the products.

Creating Sample Data
You can fill in some sample data for your data model in the ERD. This will allow that sample data to be generated to the database along with your database schema, which can be very useful in system testing.
- Right-click on the blank area of the ERD and select Show Table Record Editor or View Editor from the popup menu.

- Select the entity Category in the diagram and enter two sample categories in the editor: Car and TV Game.

- Now, select the entity Product and create two sample products: the Diecast Sport Car with a quantity of 100, which is under the Car category; and the All Sport Package with a quantity of 450, which is under the TV Game category. You can click the ... button in the foreign key column (i.e., Category) to open the selected category you defined instead of manually entering its value.

Generate Class Model from ERD
We have finished designing the database with ERD. Now, we can generate a class model from it. To generate the class model from your ERD:
- Select Modeling > ORM > Synchronize to Class Diagram from the main menu.

- Click OK in the Synchronize from Entity Relationship Diagram to Class Diagram window.

- Click OK again in the Synchronize to Class Diagram window.

- The class diagram is generated. Click the package header <default package> and enter toystore as the package for our class model. Without specifying a package, all classes will be placed in the project root, which may make it hard to manage.

The data models are ready, and we can proceed to generate Hibernate source code as well as the database.
Generate Code and Database
To generate Hibernate source code and the database:
- Select Modeling > ORM > Generate Code... from the main menu.

- Make sure Code and Database is selected in the Generate field.

- In the Code tab, select JPA as the persistence Framework.

- Select DAO as the Persistent API.

- Switch to the Database tab and select Export to database to have the database schema directly generated to the database.

- In the Generate Sample Data field, select Yes (With Auto Generated PK) to have sample data automatically inserted into the database.

- Click OK to proceed.
After that, the tables with their sample data will be generated directly to the database. You can view them in SQL Server Management Studio.

Programming with Generated Hibernate Code
Here comes the core part of this tutorial—using the generated Hibernate code.
Inserting Records into the Database
- Open the ormsamples.CreateToyStoreData.java file.

- Let's comment out the code that inserts sample data into the database and write our own code.

-
The sample code already has the basic template for object creation. Let's modify it to insert our own data. Define the name for the instance ltoystoreCategory as "RC Model" by using the setter method.
PersistentTransaction t = toystore.ToyStorePersistentManager.instance() .getSession().beginTransaction(); try { toystore.Category ltoystoreCategory = toystore.CategoryDAO.createCategory(); ltoystoreCategory.setName("RC Model"); ... -
For the ltoystoreProduct, specify its name as 1:24 RC Car with a quantity of 300.
... toystore.Product ltoystoreProduct = toystore.ProductDAO.createProduct(); ltoystoreProduct.setName("1:24 RC Car"); ltoystoreProduct.setStockQTY(300); ... -
Next, we are going to associate the ltoystoreCategory with ltoystoreProduct. Since one category contains many products (remember that we defined it as a one-to-many relationship?), we can associate them by using the collection in the generated code. The name of the collection is generated based on the role name in the association; in this case, it is the products variable in the Category class.
...
ltoystoreCategory.product.add(ltoystoreProduct);
...
Your code should look like the following.
- Now, let's try out the program. Right-click on the blank area of the code editor and select Run As > Java Application from the popup menu.

- Open SQL Server Management Studio again, and you will find that the RC Model category and the 1:24 RC Car product have been inserted into the database.

Retrieving Records from the Database
Let's retrieve data using the Hibernate code.
- Open the ListToyStoreData.java file.

- By default, the sample code will perform a query on object type one by one. But since our Category class and Product class are related to each other, we can use the association to retrieve them from the database instead of querying them in individual requests. Let's comment out the section of querying the products in the sample.

-
Edit the sample code for querying the category and append the code for printing its name.
... int length = Math.min(ltoystoreCategory.length, ROW_COUNT); for (int i = 0; i < length; i++) { System.out.println(toystoreCategorys[i].getName()); System.out.println("Containing Products:"); ... -
Next, we retrieve the product collection from the category and then convert it to an array of Product objects.
... Product[] products = toystoreCategorys[i].product.toArray(); ... -
Now, loop through the array to print out the information of the Product which is associated with the Category.
... for (int j = 0; j < products.length; j++) { System.out.println(products[j].getName() + ", QTY: " + products[j].getStockQTY()); } ... - Right-click on the blank area of the code editor and select Run As > Java Application from the popup menu to try out the sample.
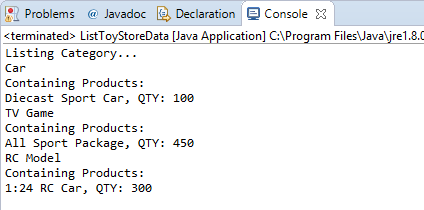
You can see the details of the Category as well as its containing Products listed in the Output window.