UML Getting Started - UML Modeling in Eclipse
Eclipse is truly one of the best integrated development environment (IDE). To many software developers, Eclipse was the first IDE they ever used for serious software development. Eclipse is easy to use, and it comes with a lot of useful features to make implementation faster and more accurate, ultimately improving efficiency and software stability.
Preparation
To follow this tutorial, you must have Visual Paradigm installed, which can be downloaded from the Visual Paradigm download page. You also need the Eclipse IDE. We assume you have already installed it, but if you haven't, please download and install it from www.eclipse.org. Additionally, ensure you have installed the Eclipse integration from Visual Paradigm. Finally, to make the tutorial easier to follow, we will not describe every minor step required to draw a class diagram in detail. We assume that you have the basic skills required to draw a UML class diagram in Visual Paradigm.
Installing the Visual Paradigm Eclipse Integration
- In Visual Paradigm, select Window > Integration > IDE Integration... from the application toolbar.

- In the Visual Paradigm IDE Integration window, check Eclipse Integration.

- Click Next.
- Enter the path of your Eclipse installation and click Next.

This begins copying files. If you see the error message "java.io.IOException: Cannot make dirs for file...", please restart Visual Paradigm with the Run as Administrator option. When file copying is finished, close Visual Paradigm and move on to the next section to see how to create a Java project in Eclipse along with a UML model.
Creating a Java Project
- Start Eclipse.
- Select File > New > Java Project from the main menu to open the New Java Project window.
- In the New Java Project window, enter My Project in the Project name field.

- Click Finish.
Creating a UML Model for the Java Project
Now that you have an empty Java project, let's create a UML model for it. To create a UML model:
- Right-click on the project node in Package Explorer and select Open Visual Paradigm from the popup menu.

- If you see the VM Requirement dialog box, keep the option Configure "eclipse.ini" and restart eclipse selected and click OK to restart Eclipse. Then, repeat the previous step to open Visual Paradigm.

- Click OK when you are prompted to select a path to store the .vpp project file.

UML Modeling in Eclipse
Let's draw a simple class diagram. We will generate Java code from it in the next section.
- In Diagram Navigator, right-click on the Class Diagram node and select New Class Diagram from the popup menu.

- A new diagram is created. Double-click on the package header at the top left corner of the diagram, labeled <default package>.

- Enter myapp and press Enter. From now on, classes drawn in this diagram will be placed in a new package named myapp. In practice, you can also enter a nested package structure like com.vp.myapp.

- Create a class by selecting Class from the diagram toolbar. Drag and drop it onto the diagram. Enter User as the name and press Enter to confirm.

- A user has two attributes: name and phone number. Let's add them. Right-click on the User class and select Add > Attribute from the popup menu.

- Enter name : String to create the name attribute with a String type. Then press Enter to confirm.
- Similarly, enter phoneNum : int to create the phoneNum attribute with an int type. Press Enter to confirm, and then press Esc to finish adding attributes.

- We want Visual Paradigm to generate getters and setters for the attributes during code generation. Right-click on the name attribute and select Create Getter and Setter from the popup menu.

- Repeat the previous step for the phoneNum attribute. At this point, your class diagram should look like this:

Generating Java Code from a UML Class
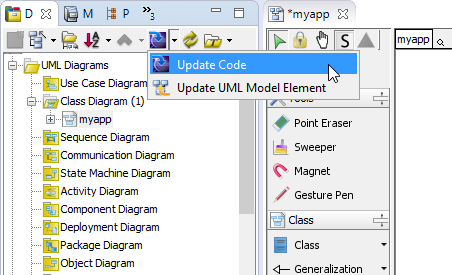
Let's produce Java source code from the UML class. There are several ways to achieve this. Here, we will try the one that generates code for the entire UML model. Click the Update Code button at the top of the Diagram Navigator.
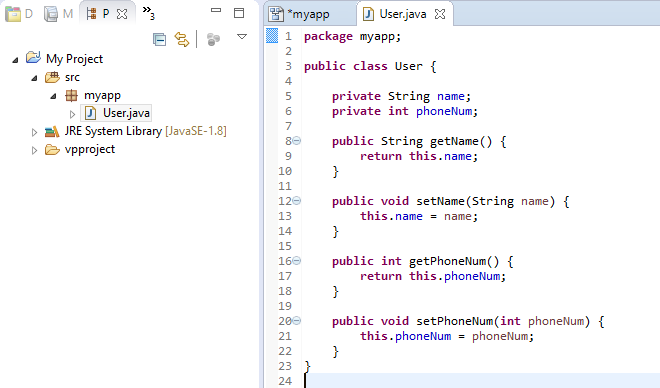
In the Package Explorer, expand the project node and the src folder node. The myapp package and the User class are there. Open User.java. You can see the User class populated with attributes and their getters and setters.
Writing Code
In this section, you are going to build an executable application with the User class.
- Create a Main class. In the Package Explorer, right-click on the myapp package and select New > Class from the popup menu.
- In the New Java Class window, enter Main as the class name and click Finish.

- Create a static main method in the Main class that creates and instantiates two User objects. Set their name and phone number through the setters.

- It would be nice to add a method to the User class to print its name and phone number. Add a public method printInfo() to the User class.

- Call printInfo() from the Main class to display the information of the created users.

Updating the UML Model from Java Code
You have made some changes in the source code, such as creating the Main class and the printInfo() method in the User class. To keep the design consistent with your source code, you need to update the UML model from the code. Let's do it now.
- In the Eclipse toolbar, click the Update UML Model button.

- Open the class diagram. The printInfo() method is now present in the User class.

- You can find the Main class under the Model Explorer. Drag it out and place it below the User class on the diagram.
