How to Design REST API? The Twitter Example
REST (REpresentational State Transfer), an architectural style for web services, is getting more and more popular in recent years. Many leading vendors have opened the doors of their services to developers, providing them with restful accesses to different web services. Twitter is one of the most well-known vendors that uses REST API.
The Twitter REST APIs provide developers with programmatic access to read and write Twitter data. With their REST APIs, you can post a tweet, retrieve followers, access follower profiles, and more. The Twitter APIs are complete and well-documented. Let's use them as an example to explain how to design REST APIs with Visual Paradigm's REST API design tool.
Problem Statement
Assuming that you are a software developer at Twitter and you have been asked to develop an API for the tweeting feature. In this tutorial, we will show you how to design the tweeting APIs, as well as the steps involved in generating the Java API code and API documentation from your design.
Before we dive into the steps, let's look at the REST APIs of Twitter, as we are going to work on designing the API for their service. In particular, check out the POST statuses/update API, which is the API we are going to design.
Overview of This Tutorial
Instead of just outlining the steps involved in using the REST API design tool, we will also explain some practical problems you may encounter in real-world scenarios and provide design methods for solving them. Here is an outline of what will be covered in this tutorial:
- Developing an object model for your REST APIs
- Designing a REST API by reusing the developed object models
- Generating Java API and API documentation.
Designing an Object Model for Your REST API
An object model is a collection and representation of API objects (i.e., classes) used by the APIs. It provides an overview of all main API objects used by the services, as well as their inter-relationships.
You should build an object model to facilitate the reuse of API objects in different API designs. Using Twitter as an example, there are four main objects in their APIs: Tweets, Users, Entities, and Places. These objects are used by different Twitter APIs. Without an object model, you would probably re-create the same objects when designing different APIs. This is not just time-consuming but also makes it difficult to keep the object specifications consistent.
So let's start by designing an object model. Since many objects are involved in the Twitter API, we will not describe them class by class or attribute by attribute. We will provide an outline of the steps. By the end of this section, you can download a project file with the complete object model.
- Let's create a diagram to design the object model. To create a Class Diagram, select Diagram > New from the toolbar.
- In the New Diagram window, select Class Diagram and click Next.
- Enter API Overview as the diagram name.

- Click OK to confirm.
- Let's draw a class for the Tweet object. Select Class in the diagram toolbar.

- Click on the diagram to create a class and name it Tweet.

- Add attributes to the Tweet class. Right-click on the class and select Add > Attribute from the popup menu.

- Enter createdAt : String to create an attribute createdAt of String type.

-
Press Enter. You will be prompted to create the next attribute. Create the following attributes.
Name and type favoriteCount : int favorited : Boolean filterLevel : String geo : String id : int idStr : String inReplyToScreenName : String inReplyToStatusId : int inReplyToStatusIdStr : String inReplyToUserId : int inReplyToUserIdStr : String lang : String retweetCount : int retweeted : Boolean source : String text : String truncated : Boolean possiblySensitive : Boolean withheldCopyright : Boolean withheldInCountries : String[] withheldScope : String - Press Esc when finished creating attributes.

-
Now, describe each of the attributes in the class. You can open the Description Editor at the bottom-right of the application window. The description you enter will appear in the API documentation.

Attribute Description createdAt : String UTC time when this Tweet was created. favoriteCount : int Indicates approximately how many times this Tweet has been "favorited" by Twitter users. favorited : Boolean Nullable. Perspectival. Indicates whether this Tweet has been favorited by the authenticating user. filterLevel : String Indicates the maximum value of the filterLevel parameter which may be used and still stream this Tweet. So a value of medium will be streamed on none, low, and medium streams. geo : String Deprecated. Nullable. Use the "coordinates" field instead. id : int The integer representation of the unique identifier for this Tweet. This number is greater than 53 bits and some programming languages may have difficulty/silent defects in interpreting it. Using a signed 64-bit integer for storing this identifier is safe. Use idStr for fetching the identifier to stay on the safe side. See Twitter IDs, JSON, and Snowflake. idStr : String The string representation of the unique identifier for this Tweet. Implementations should use this rather than the large integer in id. inReplyToScreenName : String Nullable. If the represented Tweet is a reply, this field will contain the screen name of the original Tweet's author. inReplyToStatusId : int Nullable. If the represented Tweet is a reply, this field will contain the integer representation of the original Tweet's ID. inReplyToStatusIdStr : String Nullable. If the represented Tweet is a reply, this field will contain the string representation of the original Tweet's ID. inReplyToUserId : int Nullable. If the represented Tweet is a reply, this field will contain the integer representation of the original Tweet's author ID. This will not necessarily always be the user directly mentioned in the Tweet. inReplyToUserIdStr : String Nullable. If the represented Tweet is a reply, this field will contain the string representation of the original Tweet's author ID. This will not necessarily always be the user directly mentioned in the Tweet. lang : String When present, indicates a BCP 47 language identifier corresponding to the machine-detected language of the Tweet text, or "und" if no language could be detected. retweetCount : int Number of times this Tweet has been retweeted. This field is no longer capped at 99 and will not turn into a String for "100+" retweeted : Boolean Perspectival. Indicates whether this Tweet has been retweeted by the authenticating user. source : String Utility used to post the Tweet, as an HTML-formatted string. Tweets from the Twitter website have a source value of web. text : String The actual UTF-8 text of the status update. See twitter-text for details on what is currently considered valid characters. truncated : Boolean Indicates whether the value of the text parameter was truncated, for example, as a result of a retweet exceeding the 140-character Tweet length. Truncated text will end in ellipsis, like this ... Since Twitter now rejects long Tweets vs. truncating them, the large majority of Tweets will have this set to false.
Note that while native retweets may have their top-level text property shortened, the original text will be available under the retweetedStatus object and the truncated parameter will be set to the value of the original status (in most cases, false).possiblySensitive : Boolean This field only surfaces when a tweet contains a link. The meaning of the field doesn't pertain to the tweet content itself, but instead, it is an indicator that the URL contained in the tweet may contain content or media identified as sensitive content. withheldCopyright : Boolean When present and set to "true", it indicates that this piece of content has been withheld due to a DMCA complaint. withheldInCountries : String[] When present, indicates a list of uppercase two-letter country codes this content is withheld from. Twitter supports the following non-country values for this field:
"XX" - Content is withheld in all countries
"XY" - Content is withheld due to a DMCA request.withheldScope : String When present, indicates whether the content being withheld is the "status" or a "user." - A tweet is associated with a user. Let's create an associated class from the Tweet class. Move your mouse pointer over the Tweet class. Press and drag out the Resource Catalog button at the top-right.

- Release the mouse button and select Association -> Class from the Resource Catalog.

- Enter User as the class name.

- Enter user as the role name and set 1 as multiplicity. You can specify the role name and multiplicity by double-clicking on the User end of the association connector.

-
Click on the role name user and enter its description: The user who posted this Tweet. Perspectival attributes embedded within this object are unreliable.

Again, this will be shown in the API documentation. -
As mentioned earlier, the object model is large, and we will not detail all the steps here. You can click here to download the project file with the completed object model. Open the project and the class diagram "API Overview"; you will see a diagram like this:

Now, let's move on to the next section to design our REST API.
Designing a REST API for the Tweeting API
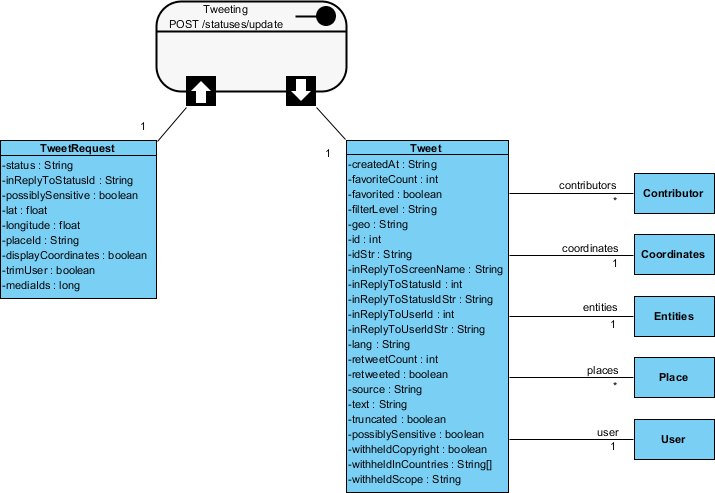
Twitter provides an API for tweeting, with statuses/update as its URI. In this section, you will design this API with the REST API design tool.
- The design of a REST API must be done in a Class Diagram. Let's create another Class Diagram called Tweeting. You are free to use any name you like; some users prefer using the URI, like /statuses/update, as the diagram name.
- Create a REST Resource for the API. Select REST Resource in the diagram toolbar.

-
Click on the diagram to create a REST Resource and name it Tweeting.

A REST resource is the fundamental unit of a RESTful API. It is an object with a URI, an HTTP request method, associated parameters, and a request/response body. Each REST resource represents a specific service available on the path specified by its URI property. Therefore, if you want to model multiple services, you should draw multiple REST resources. - Right-click on the Tweeting REST Resource and select Open Specification... from the popup menu.
-
In the General tab, fill in the following:
Field Value Remarks URI /statuses/update Each REST Resource has its own URI. Consumers use the URL to access the REST resource.
Typically, a RESTful URI should refer to a resource (a "thing") instead of an action. Therefore, when deciding on a URI, try to use a noun instead of a verb.Method POST Specifies the action to be performed on the resource.
GET - A GET method (or GET request) is used to retrieve a representation of a resource. It should be used SOLELY for retrieving data and should not alter it.
PUT - A PUT method (or PUT request) is used to update a resource. For instance, if you know that a blog post resides at http://www.example.com/blogs/123, you can update that specific post by using the PUT method to send a new representation of the resource.
POST - A POST method (or POST request) is used to create a resource. For instance, when you want to add a new blog post but do not know its specific URI yet, you can use the POST method to send the data to a URL and let the server decide the final URL for the new resource.
DELETE - A DELETE method (or DELETE request) is used to delete a resource identified by a URI.Description Updates the authenticating user's current status, also known as tweeting. A description of the resource that will appear in the generated API documentation. It is recommended to provide a clear description so that consumers know what the service does and how to use it. - Click OK.
- According to the Twitter API documentation, the statuses/update API requires several parameters, such as status, inReplyToStatusId, etc. Let's represent this in our design. Move your mouse pointer over the REST Request Body icon and drag out the Resource Catalog button at the top-right.

- Release the mouse button and select Association -> One Class from the Resource Catalog.

- Name the class TweetRequest.

-
Add the following attributes to the TweetRequest class.
Attribute Description status : String The text of your status update, typically up to 140 characters. URL-encode as necessary. t.co link wrapping may affect character counts.
There are some special commands in this field to be aware of. For instance, preceding a message with "D " or "M " and following it with a screen name can create a direct message to that user if the relationship allows for it.inReplyToStatusId : String The ID of an existing status that the update is in reply to.
Note: This parameter will be ignored unless the author of the tweet this parameter references is mentioned within the status text. Therefore, you must include @username, where username is the author of the referenced tweet, within the update.possiblySensitive : boolean If you upload Tweet media that might be considered sensitive content such as nudity, violence, or medical procedures, you should set this value to true. See "Media settings and best practices" for more context. Defaults to false.
Example Values: truelat : float The latitude of the location this tweet refers to. This parameter will be ignored unless it is within the range -90.0 to +90.0 (North is positive) inclusive. It will also be ignored if there isn't a corresponding longitude parameter.
Example Values: 37.7821120598956longitude : float The longitude of the location this tweet refers to. The valid ranges for longitude are -180.0 to +180.0 (East is positive) inclusive. This parameter will be ignored if it is outside that range, if it is not a number, if geo_enabled is disabled, or if there is not a corresponding lat parameter.
Example Values: -122.400612831116placeId : String A place in the world, represented by a place ID.
Example Values: df51dec6f4ee2b2cdisplayCoordinates : boolean Whether or not to put a pin on the exact coordinates a tweet has been sent from.
Example Values: truetrimUser : boolean When set to true, t, or 1, each tweet returned in a timeline will include a user object containing only the status author's numerical ID. Omit this parameter to receive the complete user object.
Example Values: truemediaIds : long A list of media IDs to associate with the Tweet. You may associate up to 4 media items with a Tweet. See "Uploading Media" for further details on uploading media.
Example Values: 471592142565957632
This completes the request part. You are free to create a more complex structure by creating more associated classes, but this is not usually necessary. Now, let's move on to the response part. - Values to be returned by the server, if any, are modeled via the Response Body. In the Twitter example, a Tweet object will be returned by the tweeting API. To represent this, move your mouse pointer over the REST Response Body icon and drag out the Resource Catalog button at the top-right.

-
Release the mouse button and select Association -> One Class from the Resource Catalog.

Note: If the service will return an array of objects, select Association -> Many Class instead. - Instead of creating a new class, you can reuse the Tweet class created in the object model. Type 'T' and then press Ctrl-Space to open the name completion list.

-
Select Tweet from the drop-down list. You can double-click on Tweet or use the keyboard to navigate to it and press Enter to confirm.

This reuses the Tweet class in your REST API design. As you can see, its attributes are populated automatically, so you don't have to make any changes.
- In the object model, the Tweet class is connected to several other classes (Entities, Media, etc.). You do not need to visualize all of them in the REST API design. Only include classes that are relevant to the modeling context—in this case, the tweeting API. If you think the User class is meaningful to consumers of this service, visualize it. For this example, let's assume the following classes are relevant: Contributor, Coordinates, Entities, Place, and User. Let's visualize them in our REST API design.
- Let's start with the Contributor class. You can reuse the class from the object model. First, select Class from the diagram toolbar.

- Click on the diagram to create a class, and then press Ctrl-Space to open the name completion list.

- Repeat this process to visualize the Coordinates, Entities, Place, and User classes. Your diagram should look like this:

- Although these five classes are relevant to the context, their fields may not be important to consumers who just want to use the tweeting API. You can hide their class members to make the design tidier. Select these five classes.
- Right-click on any of the selected classes and select Presentation Options > Class Members > Hide All Class Members from the popup menu.

- Rearrange the classes. Now, your diagram should look like this:

Specifying the Request and Response Header and Example
An HTTP message consists of a request line, a collection of header fields, and an optional body. For consumers to access a REST Resource, you must specify the request headers and a request body example. The specified header and example will be presented in the generated API documentation, which consumers can follow to use the API.
- Right-click on the Tweeting REST Resource and select Open Specification... from the popup menu.
- Open the Request Body tab.
-
Enter the Header:
content-type: application/json
authorization: Bearer mytoken123
-
Enter the Example in JSON:
{
    "status":"Maybe he'll finally find his keys",
    "inReplyToStatusId":null,
    "possiblySensitive":false,
    "lat":37.7821120598956,
    "longitude":-122.400612831116,
    "placeId":"df51dec6f4ee2b2c",
   "displayCoordinates":true,
   "trimUsers":true,
   "mediaIds":471592142565957632,
}
- Open the Response Body tab.
-
Enter the Header:
content-type: application/json; charset=utf-8
status: 200 OK
ratelimit-limit: 1200
ratelimit-remaining: 1137
ratelimit-reset: 1415984218
-
Enter the Example in JSON:
{ "coordinates": null, "favorited": false, "createdAt": "Wed Sep 05 00:37:15 +0000 2012", "truncated": false, "idStr": "243145735212777472", "entities": { "urls": [ ], "hashtags": [ { "text": "peterfalk", "indices": [ 35, 45 ] } ], "userMentions": [ ] }, "inReplyToUserIdStr": null, "text": "Maybe he'll finally find his keys. #peterfalk", "contributors": null, "retweetCount": 0, "id": 243145735212777472, "inReplyToStatusIdStr": null, "geo": null, "retweeted": false, "inReplyToUserId": null, "place": null, "user": { "name": "Jason Costa", "profileSidebarBorderColor": "86A4A6", "profileSidebarFillColor": "A0C5C7", "profileBackgroundTile": false, "profileImageUrl":"http://a0.twimg.com/profile_images/1751674923/new_york_beard_normal.jpg", "createdAt": "Wed May 28 00:20:15 +0000 2008", "location": "", "isTranslator": true, "followRequestSent": false, "idStr": "14927800", "profileLinkColor": "FF3300", "entities": { "url": { "urls": [ { "expandedUrl": "http://www.jason-costa.blogspot.com/", "url": "http://t.co/YCA3ZKY", "indices": [ 0, 19 ], "displayUrl": "jason-costa.blogspot.com" } ] }, "description": { "urls": [ ] } }, "defaultProfile": false, "contributorsEnabled": false, "url": "http://t.co/YCA3ZKY", "favouritesCount": 883, "utcOffset": -28800, "id": 14927800, "profile_image_url_https":"https://si0.twimg.com/profile_images/1751674923/new_york_beard_normal.jpg", "profileUseBackgroundImage": true, "listedCount": 150, "profileTextColor": "333333", "protected": false, "lang": "en", "followersCount": 8760, "timeZone": "Pacific Time (US & Canada)", "profileBackgroundImageUrlHttps": "https://si0.twimg.com/images/themes/theme6/bg.gif", "verified": false, "profileBackgroundColor": "709397", "notifications": false, "description": "Platform at Twitter", "geoEnabled": true, "statusesCount": 5532, "defaultProfileImage": false, "friendsCount": 166, "profileBackgroundImageUrl": "http://a0.twimg.com/images/themes/theme6/bg.gif", "showAllInlineMedia": true, "screenName": "jasoncosta", "following": false }, "source": null, "inReplyToScreenName": null, "inReplyToStatusId": null } - Click OK to confirm the changes.
Generating REST API and API Documentation
Once you have finished designing your REST APIs, you can generate the Java API and the API documentation.
- Select Tools > Code > Generate REST API... from the toolbar.
- In the REST API window, keep Provider selected for API Type. This will allow you to generate API documentation as well as server sample code to guide you in programming your API.
- Check the Tweeting resource to generate the API.

- Check Generate API Documentation to generate HTML files that show how to use the selected REST Resource(s). You can publish the generated API documentation on your website so that consumers of your service can read it to learn how to use your APIs.
- Enter Twitter as the Company name, which will be presented in the API documentation.
- Enter https://api.twitter.com/1.1 as the REST base URL.
- Check Generate Sample to generate source code that shows you how to program your API. The sample code is rich and informative. Instead of programming from scratch, we strongly recommend you generate the sample code and modify its content to fit your needs.
- Enter the output path for the code.

-
Click Generate. The following folders will be generated in the output directory.
Folder Description doc Contains the API documentation. You should publish this on your website so that consumers of your service can read the documentation to learn the API. lib For the generated code to work, the Google Gson library must be present in your classpath. To avoid compatibility issues, please download the library manually:
httpsa://code.google.com/p/google-gson/
Then, place the downloaded file in the lib folder.sample_src Contains sample client and servlet code. It shows you how to make access as a client and how to react to a request as a provider. We strongly recommend you copy the code and modify it by adding your own service logic. src The source code of the communication model. Do not modify the file content, or the code may not function properly. - Open the generated API documentation to see how the design (image), parameter descriptions, request/response headers, and examples are presented.

Resources
Trademark Disclaimer
Twitter is a registered trademark of Twitter, Inc.