How to Store Reference Files in a Project?
During the discussion of requirements with user, you may be given reference files that explain user's problems or needs. These files can be useful in future discussions or even be used as references during the implementation of features. In Visual Paradigm, you can maintain a reference between your software model and these with external files. If your team is using Visual Paradigm Online/Teamwork Server as the collaboration solution, you can make use of the "Teamwork Files" feature to keep these files under the project, and to have them shared among the team. In this tutorial you will learn how to do this.
Preparation
In order to complete this tutorial, your team must be using either Visual Paradigm Online ("VP Online") or Teamwork Server.
You also need a project file to walk through this tutorial. To avoid messing up your production data, we have prepared a project file for you. Please download the project file Invoicing System.vpp and ask your server administrator to import it into the server. By the end of this tutorial, you may ask the administrator to delete the project file from the server to release storage space.
Finally, since this tutorial involves sharing teamwork files with another team member, some steps will need to be performed by a team member who has read and commit permissions for the Invoicing System project. We suggest you ask a teammate to work with you to complete this tutorial.
Storing Reference Files in Your Project
- Start Visual Paradigm.
- Open the project Invoicing System from the server. You can open a project by selecting Project > Open from the application toolbar.

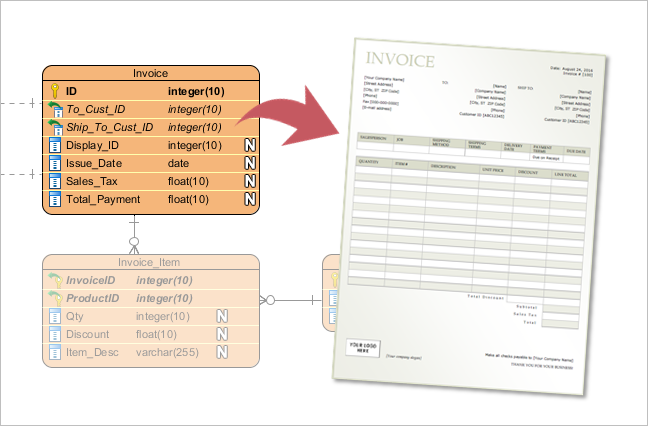
- Open the Entity Relationship Diagram (ERD) named Invoicing System ERD. You should see the diagram below.

Let's say the user has given us an invoice file for referencing. We want to maintain a reference between the database design and the invoice file so that the database designer can read it when creating and maintaining the database schema. - Now, let's add the invoice file to this project. Select View > Project Browser from the application toolbar to open the Project Browser.

- Open the Files tab.

- The Files page is where you can store and manage project-related files. Let's add the invoice file to the project. Download Invoice-Sample.pdf. You can also find this file at the bottom of this tutorial, under the Resources section.
- Let's create a folder to hold the invoice sample. On the left-hand side, there is a list that will show the files in this project. Click the New Folder button above the list.

- In the New Folder dialog box, enter References as the folder name.

- Click OK.
- Right-click on the References folder you just created and select Add File/Folder... from the popup menu.

- In the file chooser, select the downloaded invoice sample and confirm. You should see its thumbnail appear on the right-hand side of the page.

Adding a File Reference to an Entity
In this section, you will add a file reference from the Invoice entity in the ERD to the sample invoice file.
- Open the Diagrams tab in the Project Browser.

- Double-click on the thumbnail of the ERD Invoicing System ERD to open it.

- Move the mouse pointer to the Invoice entity and click on the reference resource icon at the bottom-left of the shape.

- Select Add File... from the popup menu.
- This opens the Select File window. On the left-hand side, select Project Files Folder.

- Select the file References\Invoice-Sample.pdf and click OK to return to the diagram.
Sharing the File with a Teammate
- Commit all the changes to the server by selecting Team > Commit from the application toolbar.
- Ask your teammate to open the project Invoicing System from the server, or to perform an update if they have it open already.
- Both the design changes and the files kept under the project are shared with them. They can now open the sample invoice file from the database design by clicking the reference icon on the Invoice entity and selecting Invoice-Sample.pdf from the popup menu.

They should see the file open, like this:
Watch this Tutorial on YouTube
Here is the video version of this tutorial.