User Story Tutorial - How to Write Confirmation?
User stories have three critical components often called 3Cs (card, conversation and confirmation). User stories are written on cards. The card does not contain all the information. It is a reminder of what the story is for requirement discovery process. The requirement itself is communicated from end-users to developers through conversation: an exchange of views, scenarios, and operation workflow. The final component of a user story is the acceptance criteria used to confirm that the user story is implemented correctly delivered. It is often thought up during conversations between the project team and end-users. It is best to define the acceptance criteria just-in-time before user stories are distributed in a sprint. User stories should only include the bare minimum amount of information required to enable development and allow testing to proceed with reasonable efficiency. The reason for this is to minimize time spent on anything that doesn't add value to the end product.
Benefits of Acceptance Criteria
User stories must go together with good acceptance criteria—the requirements that must be met for a story to be considered complete. Like the user story itself, acceptance criteria are written in simple language to clearly define when a work item is completed and working as expected. There are several benefits to including acceptance criteria with user stories:
- Confirmation scenarios encourage the team to think through how a feature or piece of functionality will work from the perspective of the end-user.
- Acceptance criteria remove ambiguity from requirements to avoid surprises at the end of a sprint or release and to ensure customer satisfaction.
- Developers can create tests based on those criteria that confirm when a work item is working and finalized.
Preparation
You need a project to work on. To avoid messing up your production data, create a new project in Visual Paradigm and name it Online Shop. You can create a new project by selecting Project > New from the application toolbar.
Creating a User Story
- Open UeXceler by selecting UeXceler > UeXceler from the application toolbar.
- Open the User Story page.

- Create a new user story by double-clicking on an empty region of the pane and entering the subject of the story: Customer wants to add items into shopping cart.

- Click the background of the pane to confirm.
Writing Confirmation Items for a User Story
Let's write the confirmation for the user story we just created.
- Double-click on the user story to open it.

- Open the Confirmation tab.

- Click on the first empty row and start typing the first confirmation item: Add an item to shopping cart (one-off). This means that when the product owner confirms the completion of this user story, they will check if they can successfully add an item to the shopping cart. In other words, a developer has to deliver this feature/function when implementing this user story.

- Now, enter the other items that need to be confirmed:
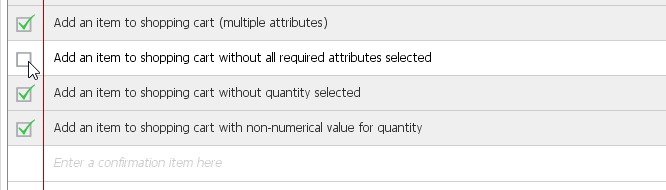
- Add an item to shopping cart (multiple attributes)
- Add an item to shopping cart without all required attributes selected
- Add an item to shopping cart without quantity selected
- Add an item to shopping cart with non-numerical value for quantity

Entering Steps and Expected Results for a Confirmation Item
For each confirmation item, the steps to take for confirmation and the expected results for each step can be further specified. Entering steps and expected results is optional. Usually, you do this when:
- You want to clarify the product owner's needs and acceptance criteria with a usage scenario as expressed by the steps and expected results.
- The product owner may not be able to recall how a feature can be confirmed, which is possibly due to:
- A potentially lengthy development period
- Complicated requirements
- Complicated system logic
To enter steps:
- Click again on the first confirmation item, Add an item to shopping cart (one-off).
- Move the mouse pointer to the right-hand side of the item, near the edge of the application window. Then, click the Add Step button.

- Enter the first step: Open an item page.

- You may enter the expected result for this step, but for this case, since the result is pretty obvious (the item page will open), we will skip it.
- Press Enter to proceed to the next step.
- Enter Select all required attributes as the step.

- Press Enter again.
- Enter Enter quantity '2' as the third step.

- Press Enter again.
- Enter Click Add to Cart as the step. Let's say we want to emphasize the triggering of a command. We can do this by selecting the text 'Add to Cart' and then pressing Ctrl+B to bold it. You can find other formatting options under the UeXceler menu in the application toolbar.

- Let's describe the result expected from adding an item to the shopping cart. You can press the Tab key to move to the Expected Result field, or click on the field directly. Then, enter Prompt to add the same item to cart, with the option to select other attributes and a new quantity.

- Press Enter to move on to the next step.
- Enter Click Cancel as the step text. Bold the word 'Cancel'.

- Enter Popup dialog box is closed as the expected result.

The Confirmation Process
As you can see, the Confirmation tab is actually a checklist of confirmation items. On the left of each item, there is a checkbox. When a product owner has confirmed a user story, they should place a check mark in the checkbox, indicating the completion of related work.
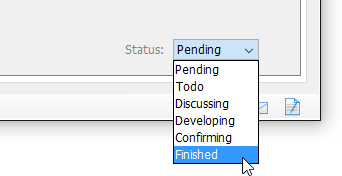
When all the items are checked, and when the user story is in the Confirming state (as shown under the Status tab), you will be prompted to set the story to the Finished state.
If you don't see the prompt, you can also set the story to Finished manually by selecting it on the Description page.
Conclusion
By making use of the confirmation feature, the acceptance criteria of user stories become transparent to all parties. Both the user and the development team will have a common understanding of what is meant by 'right'. As a result, the chance of rework is reduced and the quality of work is improved.