What is ArchiMate? How to Draw ArchiMate Diagram?
ArchiMate offers a visual language to model and capture enterprise architecture. It provides a means to visualize relationships within and between different domains. These domains primarily include products/services, processes, organization, data applications and technical infrastructure.
Why Use ArchiMate?
The domains mentioned above provide contexts for different stakeholders to analyze, design, or communicate in order to address their varying concerns. For example, a data architect may want to visualize what data are required for which products and services to customers. Perhaps a business analyst is looking to relate logical and physical business processes, which are independent and dependent of implementation, respectively. Or an enterprise architect is working to optimize and best match the applications in use with the existing technical infrastructure.
How Are Model Elements Organized in ArchiMate?
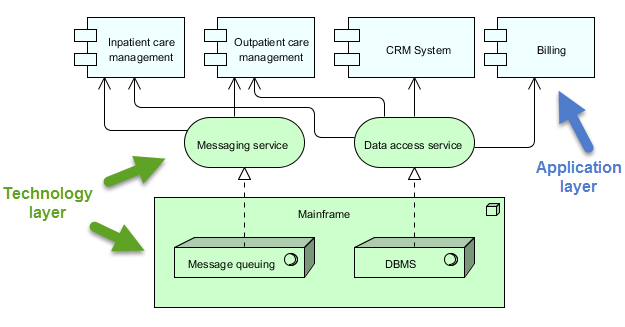
With three types of layers, ArchiMate® provides a way to look at service-oriented models. From top to bottom, they are business, application, and technology. The further we go down, the more information we get in terms of implementation (sometimes we may use the term "realize" instead).
At the top level, the business layer highlights services provided for customers. In the middle, the application layer focuses on applications that support those services available to customers. At the bottom, we can find the technology layer which shows the technical infrastructure offering services to those applications in the application layer.
Below is an ArchiMate 3 diagram example with both the technology and application layers. In it, we can see that the Inpatient care management application is implemented (or realized) by the infrastructure, messaging service, and data access service.
What Will We Do in This Tutorial?
In this tutorial, we are going to walk you through how to draw an ArchiMate diagram that looks at the procedures for discharging hospital patients, particularly from a business process viewpoint.
Upon completion of the tutorial, we should end up with a diagram similar to the one below.
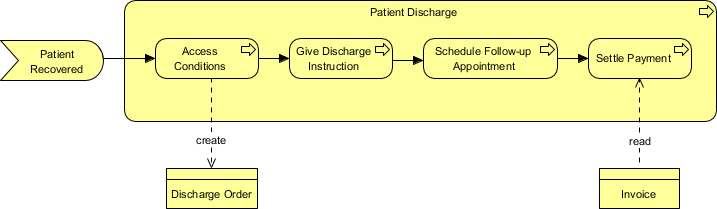
Note: For simplicity, we will limit our discussion to the business layer only in this example.
Software We'll Use
We'll be using Visual Paradigm Enterprise. You are welcome to download a free evaluation copy.
Steps to Draw the ArchiMate Diagram Example
- Start Visual Paradigm with a new project.
- Create a new diagram by selecting Diagram > New from the toolbar.

- In the New Diagram window, select ArchiMate Diagram and click Next.

- Enter Discharging Patients as the diagram name and click OK to confirm diagram creation.

- This creates a blank ArchiMate Diagram. Move your mouse pointer over the Business Event tool from the diagram toolbar and drag it onto the diagram to create a business event. Enter Patient Recovered as the name of the business event.

- Let's create a business process shape after the business event. To do this, first move your mouse pointer over Patient Recovered. Click on the Resource Catalog button at the top right of the shape and drag it out. Select Triggering -> Business Process from the Resource Catalog.

- Name the new process Patient Discharge.

- Initially, the process shape is relatively small. Here we will make it bigger so that we can draw several processes within it later. To do this, select event Patient Discharge to show the eight handles in small black squares around it. Click on the lower right handle and pull it to enlarge the shape. Similarly, you can choose to use the other handles to change the size of the shape as you wish.

- Release the mouse button. The business process shape should look something similar to the one below (in terms of proportions).

Note: It is not important to get it exact now because you can always resize the shape as you see fit along the way. - We will now draw the first process within the Patient Discharge process. Select Business Process from the diagram toolbar and drag it into the Patient Discharge process to create a child process. Name it Assess Conditions. You will then be prompted to select the kind of relationship between the parent and child process. Select Composition.

- Rewire the triggering connector coming out of Patient Recovered to Assess Conditions. Select the connector and pull to the right to extend it until it touches the boundary.

- During the process of Assess Conditions, a discharge order is created by the physician. To depict it, select Assess Conditions, click and drag on the Resource Catalog button at the top right. Release the mouse button below the enclosing Patient Discharge process and select Write Access -> Business Object from the Resource Catalog.

- Name it Discharge Order.

- Double-click on the connector and enter create as the name.

- Now, create a business process from Access Conditions. Move your mouse pointer over Access Conditions. Click and drag the Resource Catalog button at the top right. Release the mouse button and select Triggering - > Business Process from the Resource Catalog.

- Name the business process Give Discharge Instructions.

- Apply the same technique to create two more business processes: Schedule Follow-up Appointment and Settle Payment.

- As our last step, we are going to create an invoice from Settle Payment. Use the Resource Catalog to create a business object from Settle Payment with Read Access. Read access is chosen here (instead of write access) because the invoice is for viewing only as a reference.

- Name the business object Invoice and the connector read. The final ArchiMate diagram should look like the one below.