How to Build a Glossary from Domain Class Model?
In typical models, words like "user," "account," and "customer" often appear as names of model elements or as part of their descriptions. But what do they actually mean? Are they all referring to the same thing? This is a question that only the end user of the system, the system analyst, and perhaps the developer can answer. We know that the meaning of words used in models can vary depending on the system's domain, context, and users. Therefore, defining keywords is essential to building a common understanding of the vocabulary used within a project and among team members and end users. The glossary in Visual Paradigm is where you can add and define terms and phrases. Clear definitions not only avoid ambiguity but also benefit developers by reducing the risk of developing functions that don't behave as expected.
Although having a glossary is a great thing, building one can be challenging. To build a glossary, you must ask yourself, "What are the important words and phrases that need to be defined?" You might easily think of a word or two, but over time, you will find it increasingly difficult to gather words and phrases that are truly important or relevant to the system. A recommended approach is to start from a domain class model.
A domain class model is developed at the early stage of system development. It aims to capture and represent the concepts and relationships in the domain. For this reason, it can be understood by both the end user and the project team. The vocabulary used in a domain class model is supposed to be meaningful, important, and relevant to the system from the user's point of view. Therefore, a domain class model is always a reliable starting point for identifying glossary terms.
Case Study: Developing a Glossary for an Enquiry Management System (EMS)
The True Aqua Distilled Water Company is a distilled water supplier in the city. The company receives a tremendous number of user inquiries daily, and the management wants to implement an inquiry management system to improve user satisfaction. You are a system analyst, and your development team is responsible for developing the inquiry management system. Now, follow the steps below to develop the domain model and derive the glossary from it.
- Create a new project with Visual Paradigm. Select Project > New from the application toolbar.
- In the New Project window, enter Enquiry Management System as the project name. Click the Create Blank Project button.

- Create a class diagram by selecting Diagram > New from the application toolbar. Select Class Diagram and click Next.

- Enter Domain Model as the name of the diagram and click OK to confirm.
- Think about the concepts of the system and list them as classes. Here are the classes listed: Customer, Enquiry, Enquiry Type, Customer Service Assistant.

- Connect the classes (concepts) with the proper relationships.

- The domain class model is now complete. Let's derive a glossary from the model by adding the class names as glossary terms. Double-click on the "Enquiry" class. Right-click on "Enquiry" and select Add "Enquiry" to Glossary from the popup menu.

- You should see a message appear on the status bar indicating that the term Enquiry has been added to the glossary grid. Click on the glossary grid link to go there. If you miss it, don't worry. You can open the glossary grid by selecting Modeling > Glossary > Glossary Grid from the application toolbar.

- The glossary grid is where glossary terms are listed. You can check the terms and their definitions in the grid. You can also create and manage terms using the function buttons on the toolbar at the top of the glossary grid. Now, let's describe the term Enquiry. Right-click on the term and select Open Term Editor from the popup menu.

- Enter the definition of the term in the Definition field: A request for support issued by a customer, with a question or problem described.

- You can use different words to refer to the same term. This helps to avoid redundancy when creating multiple terms with the same meaning. Let's say some end users might call an inquiry a "support request." Let's add an alias called "support request." Click Add on the right side of the Aliases section (located at the top of the term editor).

- Enter Support Request in the input window and confirm. Support Request is now an alias for the term Enquiry.

- Go back to the glossary grid by selecting Modeling > Glossary > Glossary Grid from the application toolbar. You can see the alias and description (i.e., definition) as well.
-
Now, add the names of the other classes as terms:
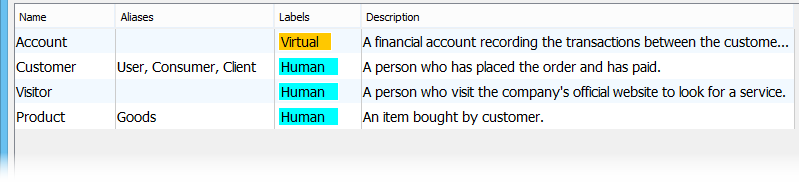
Name Aliases Documentation Enquiry Type Enquiry Group The kind of question or problem described in the enquiry. Customer Client The person who submits an enquiry. Customer Service Assistant The person who is responsible for answering an enquiry. 
-
Different readers may be interested in reading a project from different angles. To help categorize these angles, labels can be defined. Glossary terms can then be tagged with labels and filtered for listing purposes.
Now, let's define a term with a label. Click on the "Labels" cell for the term Customer in the grid. Click on the plus button at the top right corner.
- In the Add Label window, click New Label... at the bottom left. In the popup window, enter the name of the label: Human. Select a color you like and click OK to confirm.

- Click OK in the Add Label window. The label has been added to the term.

- Labels can be used to filter the terms shown in the grid. Click the Configure Grid button.

- Select With Label... for Scope.

- Check Human in the Scope window and click OK. Now, only Customer is listed in the grid.

- Change the scope back to Project. All terms are now listed.
- Go back to the class diagram. You can see that the class names are all highlighted. When a reader wants to know what a class name means, they can open the definition from the class. Move the mouse pointer to any underlined text in the diagram. Press the Ctrl key and click on the word. This will open the glossary grid with the term highlighted.

Exporting the Glossary to Excel
The term definitions can help modelers on the same team establish and maintain a common set of vocabularies when modeling and communicating with each other. You can also use the Excel export function to produce a soft copy of the glossary to share with other team members.
- Open the glossary grid.
- Click the Export to Excel button from the toolbar within the grid.

- In the Export Excel window, specify the output path where you want to save the Excel file.

-
Keep the other settings unchanged. Click Export at the bottom right.

As a side note, it is possible to import changes made in Excel back into the glossary in Visual Paradigm. If needed, readers of the glossary can make changes in Excel. After that, simply click the import button in the glossary grid (in Visual Paradigm) to import the Excel file back into Visual Paradigm. The import button is next to the export button.