How to Apply Storyboard in User Story?
User stories is a proven technique in requirements capturing. Agile practitioners treat user stories as important development artifacts for their scrum and XP (Extreme Programming) because well written user stories are much more than requirement statements and can bring a lot of benefits in the whole agile life cycle. The three major elements of a user story, known as the Three 'C', involves 'Card' which encourages the collection of requirements in manageable scale, 'Conversations', which represents the discussions between project team and stakeholders, aiding the correct planning and development of features, and 'Confirmations', which are items that can be used in confirming the completion of features in acceptance tests. All these lead to a clear result - better software system built.
Storyboards are a technique frequently used in the clarification and confirmation of requirements. A storyboard involves a sequence of wireframes. These wireframes, when put together, form a basic screen flow that represents the key components involved in a feature as well as the basic user interaction in achieving a user goal. Storyboards are simple enough for everyone to create, modify, and understand. They also leave room for further brainstorming of requirements.
While each user story represents a unique requirement of the system, creating a storyboard for a user story helps to ensure that the project team understands the story and the stakeholders' expectations accurately. And when stakeholders are unclear about the functionalities they need, the use of a storyboard can help extract ideas from their minds, which can be further captured as conversation and confirmation items.
In this tutorial, we will show you how to create a user story and how to add a storyboard to the story. After that, we will add several wireframes to the storyboard. To let you understand the flow, we will keep the tutorial as simple as possible. We will not go into detail about the concepts of wireframes and wireframe widgets. If you are interested, you can read the user's guide article.
Creating a User Story
- Create a new project first. Select Project > New from the application toolbar.
-
Enter Tutorial as the project name.

- Click Create Blank Project to create the project.
- Select UeXceler > UeXceler from the toolbar.
-
You should now be on the User Story page. Double-click on Add a feature...10 days to create a user story.

-
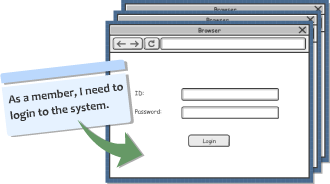
Enter As a member, I need to login to the system as the requirement statement.

-
Click on the background (i.e., the gray area) to confirm the creation of the story.

Adding a Storyboard to a User Story
-
Double-click on the user story to open its details.

-
Open the Storyboard tab.

-
Click Add New Storyboard.

- Enter Login System as the name of the storyboard and then click OK to confirm.
Creating Wireframes in a Storyboard
-
Double-click on the newly created storyboard to open it.

-
Click Add Wireframe to Storyboard.

-
Let's say we are going to develop a website. Select Website in the New Wireframe window and click New Website Wireframe.

-
Use the wireframe tools to create a wireframe that looks like this:

-
Click Done at the top-right corner to go back to the storyboard.

-
A storyboard consists of multiple wireframes. Let's add more. Click Add Wireframe to Storyboard again.

-
Let's create a wireframe with the ID and password fields filled. Instead of drawing everything from scratch, create a child state from the previous wireframe. Click on Create Child State below the initial wireframe state you drew.

-
Modify the wireframe (state) to make it look like this:

-
Again, click Done at the top-right corner to go back to the storyboard. You should have created a user story with a storyboard that has two wireframes in it.

Playing a Storyboard
You may want to show stakeholders the screen flow as created by the wireframes. To do this, you can perform a 'slideshow' of your storyboard. To play a storyboard:
- Select UeXceler > Play Storyboard from the application toolbar.
-
Now, you can press the right and left buttons to navigate through the wireframes in the storyboard.
