How to Generating DB Specification from Database>
Imagine one day, the database administrator in your company has retired and you are appointed to take care of your corporate database. There is no documentation available and everything is in the administrator's mind. Now, your boss asks you to make some changes on the database, what can you do?
With Visual Paradigm, you can reverse-engineer your database to create Entity-Relationship (ER) models, which allow you to analyze and document them by creating context-sensitive Entity-Relationship Diagrams (ERDs). Then, you can create a detailed database specification from your model.
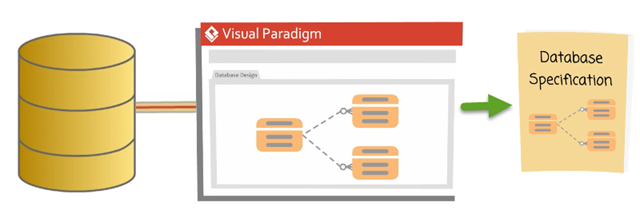
With the database specification, your database becomes understandable. In this tutorial, we will use an online shop with a Microsoft SQL Server database as an example to show you how it works.
Reverse-Engineer Your Database to an Entity-Relationship (ER) Model
The first step in creating a specification for your database is to reverse-engineer it into an ER Model. To do this:
- Go to Tools > DB > Reverse Database...

- In the Select Language page of the Database to Data Model window, select Popup entities tree (can drag entities to diagram on demand) in the Result field. Click Next to proceed.

- Select MS SQL Server (jDTS Driver) in the Driver field.

-
Click the green down arrow button next to the Driver file field to download the driver if you don't have one.

- Note that you will need an internet connection and administrator permission to download and install the driver file.
- Fill in the Hostname, port number, Database name, as well as the User name and Password to connect to your database server.

- Click Test Connection to confirm that the connection settings are correct. Click Next to proceed.
- Choose Selected Schema, then choose dbo in the Selecting Schemas page. Click Next to proceed.

- Click Next again in the Selecting Tables page to reverse-engineer all the tables in your database to an ER model.

- Review the entities and columns that have been generated, then click Finish to complete the process.

Create Context-Sensitive ERDs
Now that your database has been reverse-engineered into an ER model in the project, you can visualize it as an ERD to better understand it. You can create multiple context-sensitive ERDs, each focusing on a small part of the database, so that they can be read and understood more easily. To create context-sensitive ERDs:
- By default, a new ERD has been automatically created. Let's rename it to Order and use it to model the entities related to your shop's order processing. With the Reversed Entities window open, double-click on the diagram name in the breadcrumb and enter Order as the new name.

- Press Enter to confirm the change.
- Uncheck the Remove selection after drag to diagram option in the Reversed Entities window.

- Drag and drop the entities related to order processing, including Customer, Order, OrderLine, Payment, and Product, into the diagram.

- The ERD related to order processing has been created, and you can now touch up its layout.

- Now, let's move on to creating the other ERDs. Click Create ERD in the Reversed Entities window to create a new ERD.

-
Drag and drop the entities again to create the following ERDs:
ERD Entities Product Brand Brand, Product Admin Staff, Role - Close the Reversed Entities window.
Documenting the Details of the Database
After creating the context-sensitive ERDs, you should have a good understanding of your database. You can now start documenting its details. To document the database, select the entities in the ERD and enter a description for each entity in the Description pane. You can show the Description pane by clicking the Show Description button on the right of the status bar.
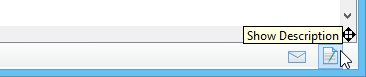
Then, select the entities one by one and enter their descriptions.
Repeat the steps to fill in the documentation for the following entities:
| Table | Description |
|---|---|
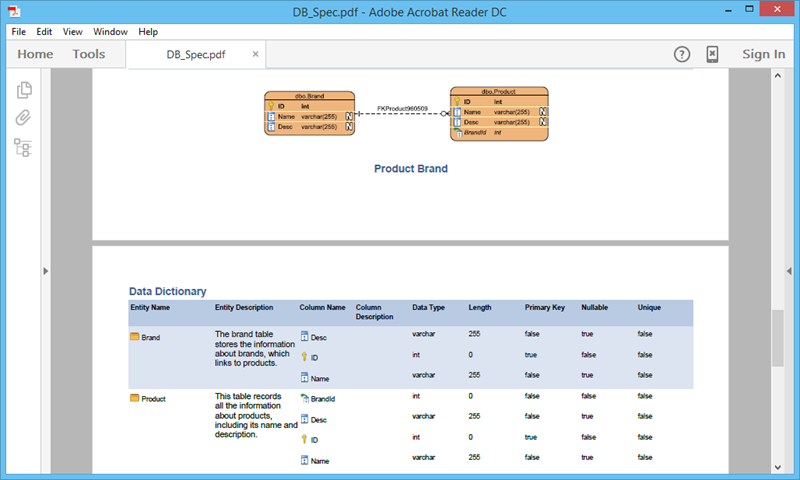
| Brand | The brand table stores information about brands, which links to products. |
| Customer | This table stores contact information for customers. |
| Order | The order table stores details about different orders, including the date and time the orders were placed, as well as any special remarks. |
| OrderLine | This is a link entity between order(s) and product(s). |
| Payment | Each customer can register multiple credit cards for payment, but each order can only be settled by a single credit card. |
| Product | This table records all information about products, including their names and descriptions. |
| Role | This table stores user role information. |
| Staff | This table stores contact information for all staff. |
Producing a Database Specification
Now, you are ready to produce the specification for your database. To produce the specification as a PDF:
- Select Tools > Doc. Composer from the application toolbar.

- Click on Build Doc from Scratch.

- You will be presented with the Diagram Navigator, the Template Pane, and an empty document (editor). Let's create content in the document. Select the ERD Order in the Diagram Navigator. Then, drag the Basic template from the Template Pane and release it onto the document to create the content. You should see an image of your ERD with its name under it.

- Keep Order selected in the Diagram Navigator. This time, drag the Data Dictionary template onto the document, below the image.

- Repeat the previous two steps on the Product Brand and Admin diagrams.
- As you can see, the table is a bit narrow to fit the entity description nicely. Let's change the orientation of the document to landscape. To do this, click on Document Properties... above the document editor.

- Open the Page Setup tab and select Landscape for Page Orientation.

- Click OK to confirm.
- Refresh the document content by clicking the Refresh button above the document editor.

- Let's export the document as a PDF. Click the Export button at the top right of the document editor and then select PDF Document... from the popup menu.

- In the Export PDF Doc. window, enter the output path for the PDF file and the Document Info, such as Title, Author, and Subject.

- Click Export.
After that, the details of your database will be generated into a PDF document, which will allow you to study it further or share it with your colleagues.
Download Sample Database
You can download the sample database script to walk through this tutorial.
Watch this Tutorial on YouTube
Here is the video version of this tutorial.