How to Generate ERD from DDL?
Visual Paradigm enables you to create a database model from an existing database. Entity Relationship Diagram (ERD) graphically shows the structure of a database so you can see how database elements, such as tables and views, relate to each other without viewing the actual data. This can streamlines creating a new database or understanding the structure of an existing database.
For an existing database, an ERD can be generated from its schema through reverse engineering. However, what if your database is not directly accessible for reverse engineering (e.g., for security reasons, the production database cannot be accessed directly)? What is the alternative in this situation?
Generating a DDL File from a Database
Most Database Management Systems (DBMS), such as Oracle, Microsoft SQL Server, and MySQL, support exporting a database schema to a Data Definition Language (DDL) file. In this tutorial, you will first learn how to generate a DDL file and then how to reverse engineer that file to visualize your database as an ERD. A video demo is also provided at the end of this tutorial.
Microsoft SQL Server will be used as an example throughout the tutorial. To generate a DDL file for your SQL Server database:
- Open SQL Server Management Studio and connect to your database.

- Right-click on the database you want to reverse engineer and select Tasks > Generate Scripts...

- Click Next in the Generate and Publish Scripts dialog.

- Choose Select specific database objects, select all Tables from the list, and then click Next to proceed.

- Specify the output path for the script file in the File name field.

- Select ANSI text in the Save as field, then click Next to proceed.

- Review the selection and click Next to start generating the DDL script.

- Click Finish when the process is complete.

For Other Popular Databases
MySQL
For MySQL, the database schema can be exported using the mysqldump command with the following arguments:
mysqldump -u %user% -p --no-data %db_name% > %path_to_script_file%
This command will extract the schema of your specified database into a script file at the path you specified.
Oracle
For Oracle, the database schema can be exported using the expdp command (Data Pump) with arguments like these:
expdp %user_name%/%password%@%host% schemas=%schema% dumpfile=%path_to_script_file% content=metadata_only
This will extract the specified schema into the dump file path specified by the dumpfile argument.
PostgreSQL
For PostgreSQL, the database schema can be exported using the pg_dump command with the following arguments:
pg_dump -h %hostname% -u %user_name% -p %port% --schema-only %database_name% > %path_to_script_file%
This will extract the schema of your specified database into a script file at the path you specified.
Reverse Engineering a DDL File into an ERD
Once the DDL file is ready, we can reverse engineer it into an ERD. To reverse engineer your DDL file:
- Go to Tools > Database > Reverse DDL...

- Specify the path of the DDL file you exported in the previous step in the File path field.

- Select the source database type from the Database dropdown list.

- Check the Generate ERD box to have Visual Paradigm automatically generate the ERD.

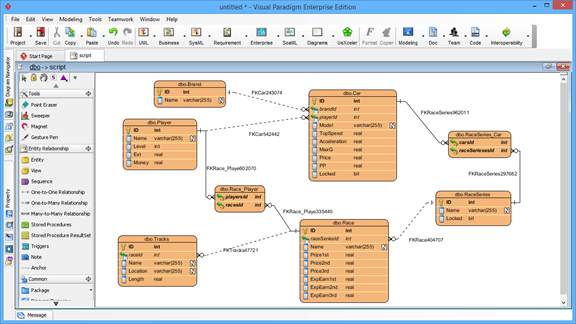
- Click OK to proceed. After that, the ERD for your database will be generated. You can then analyze or work with it.
Watch this Tutorial on YouTube
How to Reverse Database Schema into ERD without Connecting to a Database