ERD Tutorial: How to Design and Generate SQL Server DB?
You can design database with ERD, and construct database by generating from the resulting ERD. In this tutorial, you will draw a simple ERD of an online bike shop, define sample data for your database and generate database to Microsoft SQL Server from it. Visual Paradigm and SQL Server 2014 will be used in this tutorial.
Create a Database in SQL Server
The first thing we need to do is to get a brand new database ready in SQL Server. To create a new database in SQL Server:
- Open SQL Server Management Studio.

- Log in to your SQL Server.

- Right-click on the Databases root node in Object Explorer and select New Database....

- Name the database BikeShopDB, and click OK to create it.

Once the database is created, we can prepare Visual Paradigm to model it.
Configure the Default Database for Your Project
Visual Paradigm supports database modeling for multiple DBMS. Since each DBMS has its own data types that may not be compatible with others, it is important to specify SQL Server as our default database before we start modeling. The data types for SQL Server will be available in our ER diagram once we specify it as our default database. To configure the default database in Visual Paradigm:
- Go to Tools > DB > Database Configuration...

- Select MS SQL Server in the database list.

- Select 2008 or higher in the Version field (as we are using SQL Server 2014).

-
In this tutorial, we will use the jTDS driver to establish a connection with our database. Click the green arrow button next to the Driver file field to have Visual Paradigm download the driver for you.

If you wish to use another driver, you can select it from the Driver field and click the ... button to locate the driver file on your local file system. - Fill in the hostname or IP address of the machine hosting your SQL Server in the Hostname field, and enter the port number of your SQL Server instance in the Port field. After that, enter BikeShopDB in the Database name field, as well as your username and password for accessing the database.

-
When you have finished entering the connection details, click the Test Connection button to check that everything is correct.

Now we are ready to start modeling our database with an ERD.
Model Your Database with an ERD
Let's start to model our bike store database with an ERD.
- Go to Diagram > New to open the New Diagram dialog.

- Enter erd in the search box to locate the Entity Relationship Diagram. Click Next to proceed.

- Name the ERD BikeShop, and click OK to create the blank ER diagram.

- Select Entity from the diagram toolbar. Then, click on the diagram to create an entity. Name it Item and press Enter to confirm.

- Right-click on the Item entity and select New Column from the popup menu.

- Enter +ID : int and press Enter to create a primary key column 'ID' with the type int.

- By default, a new column will be created and enter editing mode after you confirm the previous one. Now, enter name : varchar(255) and price : float(2) for the next two columns.

- Press the Esc key on your keyboard to stop editing the Item entity.
- Every Item may have various variations; for instance, a bike jersey will have different sizes and colors. Let's create an ItemVariant entity from the Item entity with a one-to-many relationship. Move the mouse pointer over the Item entity. Press on One-to-Many Relationship -> Entity and drag it out.

- Release the mouse button and name the new entity ItemVariant.

-
Right-click on the ItemVariant entity, select New Column from the popup menu, and then enter the following columns:
Column Name Type +ID int detail varchar(255) color varchar(30) size varchar(50) qty int - Repeat the steps above to create the ERD as below.

- Finally, we have to store the items purchased in each order. We should relate the Order entity with ItemVariant instead of Item, since ItemVariant is the entity storing the actual item variant. As each Order can have multiple ItemVariants, and each ItemVariant can be involved in multiple Orders, a many-to-many relationship should be created. Move the mouse pointer over the Order entity. Press on Many-to-Many Relationship -> Entity, drag it out, and drop it on the ItemVariant entity.

- A link entity between Order and ItemVariant is created. Rename this link entity to OrderLine.

- Right-click on OrderLine, select New Column from the popup menu, and then enter qty : int.

Now our ERD is ready, and we can start to define the sample data for our database.
Define Sample Data
Defining sample data for your ERD will help you to better understand how your database works. The sample data will also be generated in the database, which saves you time in preparing sample data to test your database. To define sample data for your ERD:
- Right-click on the blank area of your ERD and select Show Table Record Editor or View Editor.

- Select the Customer entity in the diagram. You will now see the Table Record Editor showing the columns of the Customer entity.

-
Enter the following customer details into the Table Record Editor.
ID (PK) firstName lastName email address Phone 1 John Doe [email protected] 1205, river side 12345678 2 Peter Pan [email protected] 306, cox road 87654321 3 Mary Jane [email protected] 52, wolf hill 12358764 - Let's move on to the Order entity. Since an Order must be placed by someone, we can pick a Customer record when filling in the sample data for Order. Click the ... button in the foreign key (FK) cell in the Table Record Editor.

- This will bring up the sample data you defined for Customer. Choose the record for Peter from the list, and the FK value for Peter will be filled in for you in the Order record.

-
Repeat the above steps to define the following sample data.
OrderID (PK) datetime CustomerID (FK) 1 2015-06-02 17:30:15 2 2 2015-06-02 18:20:22 1
BrandID (PK) name 1 3R 2 Red Line
CategoryID (PK) name 1 Components 2 Cloths
ItemID (PK) name price CategoryID (FK) BrandID (FK) 1 Handle Bar 799 1 1 2 Head Set 999 1 2 3 Jersey 299 2 1 4 Shoes 1599 2 1
ItemVariantID (PK) detail color size qty ItemID (FK) 1 full carbon black NA 50 1 2 NA black NA 40 2 3 NA pink NA 40 2 4 short sleeve white M 150 3 5 short sleeve white L 150 3 6 short sleeve white XL 50 3 7 short sleeve white S 100 3 8 short sleeve blue M 150 3 9 short sleeve blue L 150 3 10 short sleeve blue XL 50 3 11 short sleeve blue S 80 3 12 short sleeve blue XS 20 3 13 road black 39 40 4 14 road white 39 20 4
OrderLineOrderID (PK) ItemVariantID (PK) qty 1 1 1 1 4 1 2 13 1 2 9 1 2 3 1
Once everything is ready, we can then move on to generating the database.
Generate Database
Now that everything is ready, let's generate the database. To generate the database:
- Go to Tools > DB > Generate Database...

- Select Database only under Generate.

- Specify the Output Path if you wish to keep the DDL file for your database.

- In the Generate Database field, select Create Database.

- Select Export to database to have Visual Paradigm directly execute the DDL script on your database.

- In the Generate Sample Data field, select Yes (With Auto Generated PK).

- Click OK to proceed.

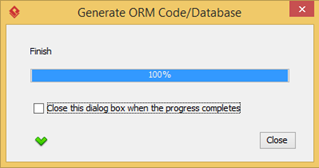
If everything is correct, you will see a progress dialog showing "100% complete".
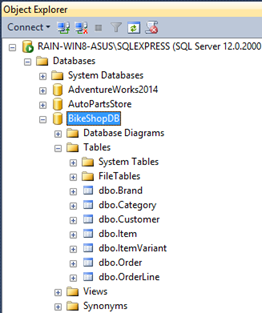
Now, let's go to SQL Server Management Studio to review our database.
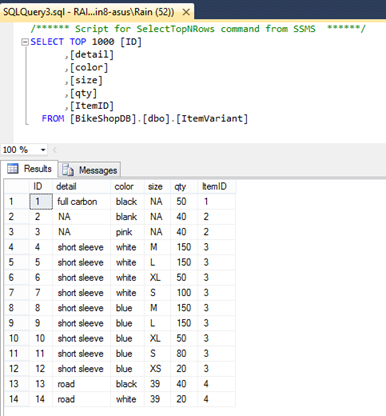
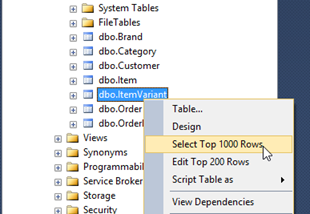
Let's try to see what's inside the ItemVariant table. Right-click on it and choose Select Top 1000 Rows from the popup menu.
And you can see the sample data is there.