How to Design REST API?
REpresentational State Transfer, an architectural style that can be used in building networked applications, is becoming increasingly popular nowadays. Many leading vendors have opened the doors of their services to developers, providing them with restful accesses to different web services.
This tutorial shows how to design a REST API with Visual Paradigm. The generation of API code and API documentation will also be covered.
In this tutorial, we will use a simple membership registration service as an example to show how to design the REST API for such a service.
Designing the REST API
- The design of a REST API must be done in a Class Diagram. To create a Class Diagram, select Diagram > New from the toolbar.
- In the New Diagram window, select Class Diagram and click Next.
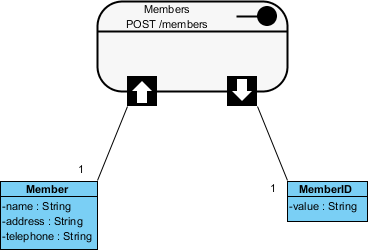
- Enter Membership Registration API Design as the diagram name.

- Click OK to confirm.
- Select REST Resource in the diagram toolbar.

-
Click on the diagram to create a REST Resource and name it Members.

A REST resource is the fundamental unit of a RESTful API. It is an object with a URI, an HTTP request method, associated parameters, and a request/response body. Each REST resource represents a specific service available on the path specified by its URI property. Therefore, if you want to model multiple services, you should draw multiple REST resources. - Right-click on the Members REST Resource and select Open Specification... from the popup menu.
-
In the General tab, fill in the following:
Field Value Remarks URI /members Each REST Resource has its own URI. Consumers use the URL to access the REST resource.
Typically, a RESTful URI should refer to a resource (a "thing") instead of an action. Therefore, when deciding on a URI, try to use a noun instead of a verb.Method POST Specifies the action to be performed on the resource.
GET - A GET method (or GET request) is used to retrieve a representation of a resource. It should be used SOLELY for retrieving data and should not alter it.
PUT - A PUT method (or PUT request) is used to update a resource. For instance, if you know that a blog post resides at http://www.example.com/blogs/123, you can update that specific post by using the PUT method to send a new representation of the resource.
POST - A POST method (or POST request) is used to create a resource. For instance, when you want to add a new blog post but do not know its specific URI yet, you can use the POST method to send the data to a URL and let the server decide the final URL for the new resource.
DELETE - A DELETE method (or DELETE request) is used to delete a resource identified by a URI.Description Create a new member by providing their name, address, and telephone number. You will receive an object that holds the name, address, telephone number, and member ID of the member. Description of the resource that will appear in the generated API documentation. It is recommended to provide a clear description of the service, so that consumers know what the service does and how to use it. - Click OK.
- Let's say membership registration requires users to provide information like name, address, and telephone number. At the API level, these are the parameters required by the service and must be provided by the consumer. Let's represent this in our design. Move your mouse pointer over the REST Request Body icon and drag out the Resource Catalog button at the top-right.

- Release the mouse button and select Association -> One Class from the Resource Catalog.

- Name the class Member.

- Add three String attributes to the Member class as parameters: name, address, and telephone.

-
Enter the description for the three attributes. You can enter the description in the description editor or in the attribute specification window (Right-click on an attribute and select Open Specification... from the popup menu). The description entered will be presented in the API documentation.
Attribute Description name The full name of the member. address The residential address of the member. telephone The telephone number of the member. 
This completes the request part. You are free to create a more complex structure by creating more associated classes, but this is not usually necessary. Now, let's move on to the response part. - Values to be returned by the server, if any, are modeled via the Response Body. Let's say a member ID will be returned by the server upon the creation of a membership. Move your mouse pointer over the REST Response Body icon and drag out the Resource Catalog button at the top-right.

-
Release the mouse button and select Association -> One Class from the Resource Catalog.

Note: If the service will return an array of objects, select Association -> Many Class instead. - Name the class MemberID.

- Add a String attribute named value.

- Enter the description of the value attribute: The member ID.
Specifying the Request and Response Header and Example
An HTTP message consists of a request line, a collection of header fields, and an optional body. For consumers to access a REST Resource, you must specify the request headers and a request body example. The specified header and example will be presented in the generated API documentation, which consumers can then follow to use the API.
- Right-click on the Members REST Resource and select Open Specification... from the popup menu.
- Open the Request Body tab.
-
Enter the Header:
content-type: application/json
authorization: Bearer mytoken123
-
Enter the Example in JSON:
{
   "name" : "Peter",
    "address" : "100, Happy Valley",
    "telephone" : "12345678"
}
- Open the Response Body tab.
-
Enter the Header:
content-type: application/json; charset=utf-8
status: 200 OK
ratelimit-limit: 1200
ratelimit-remaining: 1137
ratelimit-reset: 1415984218
-
Enter the Example in JSON:
{
  "MemberID": {
    "value": "MB-3001"
  }
}
- Click OK to confirm the changes.
Generating REST API and API Documentation
Once you have finished designing your REST APIs, you can generate the API code and the API documentation.
- Select Tools > Code > Generate REST API... from the toolbar.
- In the REST API window, keep Provider selected for API Type. By doing so, you will be able to generate API documentation as well as server sample code that guides you in programming your service logic.
- Check the Members resource to generate the API.
- Check Generate API Documentation to generate the HTML files that show how to use the selected REST Resource(s). You can publish the generated API documentation on your website so that consumers of your service can read it to learn how to use your APIs.
- Enter your company name, which will be presented in the API documentation.
- Enter the base URL of your services.
- Check Generate Sample to generate source code that shows you how to program your API. The sample code is rich and informative. Instead of programming from scratch, we strongly recommend you generate the sample code and modify its content to fit your needs.
- Enter the output path for the code.

-
Click Generate. The following folders will be generated in the output directory.
Folder Description doc The API documentation. You should publish the API documentation on your website so that consumers of your service can read the documentation to learn the API. lib For the generated code to work, the Google Gson library must be present in your classpath. To avoid any compatibility issues, please download the library manually:
https://code.google.com/p/google-gson/
Then, place the downloaded file in the lib folder.sample_src The sample client and servlet code. It shows you how to make access as a client and how to react to a request as a provider. We strongly recommend you copy the code and modify it by adding your own service logic. src The source code of the communication model. Do not modify the file content, or the code may not function properly. - Open the generated API documentation and take a look. The design (image), description of parameters, request and response headers, and examples are presented in the document.
