How to Keep ERD and Data Dictionary Synchronized?
Data modeling is often the first step in database design as the developers will typically create a conceptual model of how data items relate to each other. Data modeling involves a progression from conceptual model to logical model to physical schema. While a conceptual or logical Entity Relationship Diagram (ERD) will focus on the high-level business concepts, a Data Dictionary will provide more detail about a business concept, such as standard definitions of data elements, their meanings, and allowable values.
What is Data Modeling?
Data modeling is the process of representing data objects and their relationships to other objects. Data modeling is performed to define the data requirements of an information system in supporting business processes.
What is a Data Dictionary?
A data dictionary is a textual description of data objects and their inter-relationships. It is commonly used to confirm data requirements and for database developers to create and maintain a database system. A data dictionary describes the physical attributes of a data element. What is the data type (string, boolean, integer, etc.)? What is the maximum length? What is the format?
What is this Tutorial About?
This is a data modeling tutorial written to outline the steps you need to take to perform data modeling and produce a data dictionary in Visual Paradigm.
Preparation
To complete this tutorial, make sure you have Visual Paradigm downloaded and installed. Click here to download Visual Paradigm if you do not have it installed.
Part I - Data Modeling
In this section, we will use the ERD tools to create a simple database design.
- Create a new project in Visual Paradigm. You can create a project by selecting File > New Project from the main menu.
- To create an Entity Relationship Diagram, select Diagram > New from the toolbar.
- In the New Diagram window, select Entity Relationship Diagram and click Next. Give the diagram a name and click OK to confirm.

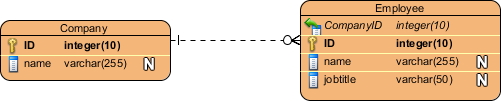
- Draw a Company entity. To draw an entity, select Entity from the diagram toolbar (on the left-hand side of the diagram) and click on the blank area of the ERD to create one.

- Right-click on the Company entity and select New Column from the popup menu.

- Enter + ID : integer. The "+" stands for a primary key, while ID is the name of the column and integer is its type.

- Press Enter and create another column: name : varchar(255). This column is not a primary key, so you don't need to add a "+" before it. It's a varchar with a length of 255.

- Press Enter to confirm editing.
- Press Esc to complete column creation.
- Let's create one more entity. Move your mouse pointer over the Company entity. Click on the Resource Catalog icon at the top right and drag it out.

- Release the mouse button in the empty space on the right-hand side. Select One-to-Many Relationship -> Entity from the Resource Catalog.

- Enter Employee as the entity name.

- Right-click on the Employee entity and select New Column from the popup menu.
- Again, enter +ID : integer to create a primary key for this entity.
- Press Enter and create another column: name : varchar(255).
- Press Enter and create another column: jobtitle : varchar(50).
- Press Enter to confirm the edit.
- Press Esc to complete column creation.

- Let's describe the entities and columns in detail. Open the Description Pane by clicking the Show Description button at the bottom right of the application window.

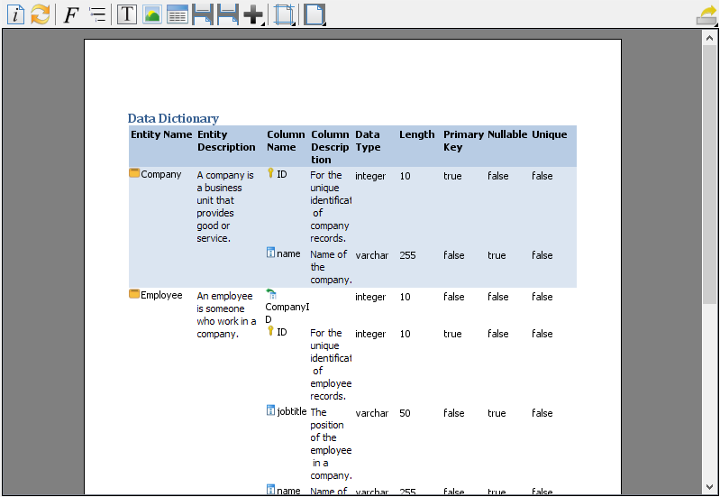
- Click on the Company entity and enter its description: "A company is a business unit that provides goods or services."

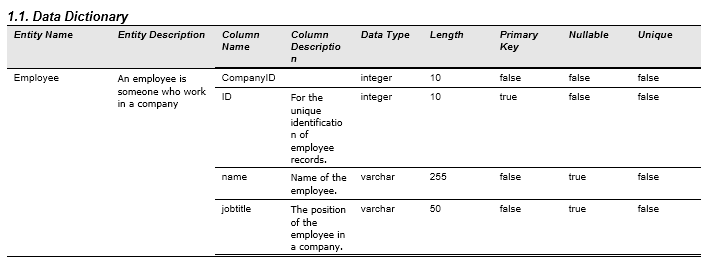
- Similarly, click on Employee and enter its description: "An employee is someone who works in a company."
-
Repeat the steps for the columns in the Company entity:
ID - For the unique identification of company records.
name - The name of the company.
-
Repeat the steps for the columns in the Employee entity:
ID - For the unique identification of employee records.
name - The name of the employee.
jobtitle - The position of the employee in a company.
Part II - Producing a Data Dictionary
Time to produce a data dictionary! There are several reporting tools you can select to produce a data dictionary. In this tutorial, let's try Doc. Composer.
- Select Tools > Doc. Composer from the toolbar.
- Select Build Doc from Scratch in Doc. Composer.

- This creates an empty report. You need to fill it with content. In this tutorial, the data dictionary. Now, click on the ERD listed under the Diagram Navigator.

- The Template Pane (at the bottom left of the application window) lists the available templates for an ERD. Select Data Dictionary and drag it to the document.

- Release your mouse button to produce the content of the data dictionary.
- Are you happy with the content? Let's try something different. Create a new document. Again, select Tools > Doc. Composer from the toolbar and then select Build Doc from Scratch in Doc. Composer.
- Click on the ERD listed under the Diagram Navigator.
- This time, select the Basic template and drag it onto the document.

- Select the Data Dictionary 2 template and drag it onto the document, under the ERD image.

- Let's change the pages to show in landscape. Click on Document Properties... in the toolbar.

- In the Document Properties window, open the Page Setup tab.
- Select Landscape for Page Orientation.

- Click OK to return to Doc. Composer. Looks pretty nice now, doesn't it?
- Now, let's produce a Word document from Doc. Composer. Click the Export button at the top right corner of Doc. Composer, and then select Word Document... from the popup menu.

-
In the Export Word Doc. window, specify the output path of the Word file and click Export.

You now have a Word document of your data dictionary. In practice, you can send this to your client, the database administrator, or anyone who needs to refer to it.
Part III - Keeping the Data Dictionary Up-to-Date
One of the most important, yet challenging, parts of documenting a design is keeping the document up-to-date, showing the latest changes made in the design. Imagine if you have added more entities to the ERD, or have updated the definition of some entities. You will probably need to update the data dictionary to reflect the latest changes. The Doc. Composer provides a 'refresh' function to accomplish this. Let's try it.
- Open your ERD.
- Add an entity named Project from the Employee entity, with a one-to-many relationship in between.

-
Now, go back to your document with the data dictionary.
On top of the document, there is a toolbar. Click the Refresh button.
-
You should see the document content updated to show the new entity in the image.

So now, you can export an updated data dictionary and send it to anyone who needs it. :-)